Netgear EVA9100 EVA9100 Install Guide - Page 1
Netgear EVA9100 - Digital Entertainer Express Manual
 |
UPC - 606449068139
View all Netgear EVA9100 manuals
Add to My Manuals
Save this manual to your list of manuals |
Page 1 highlights
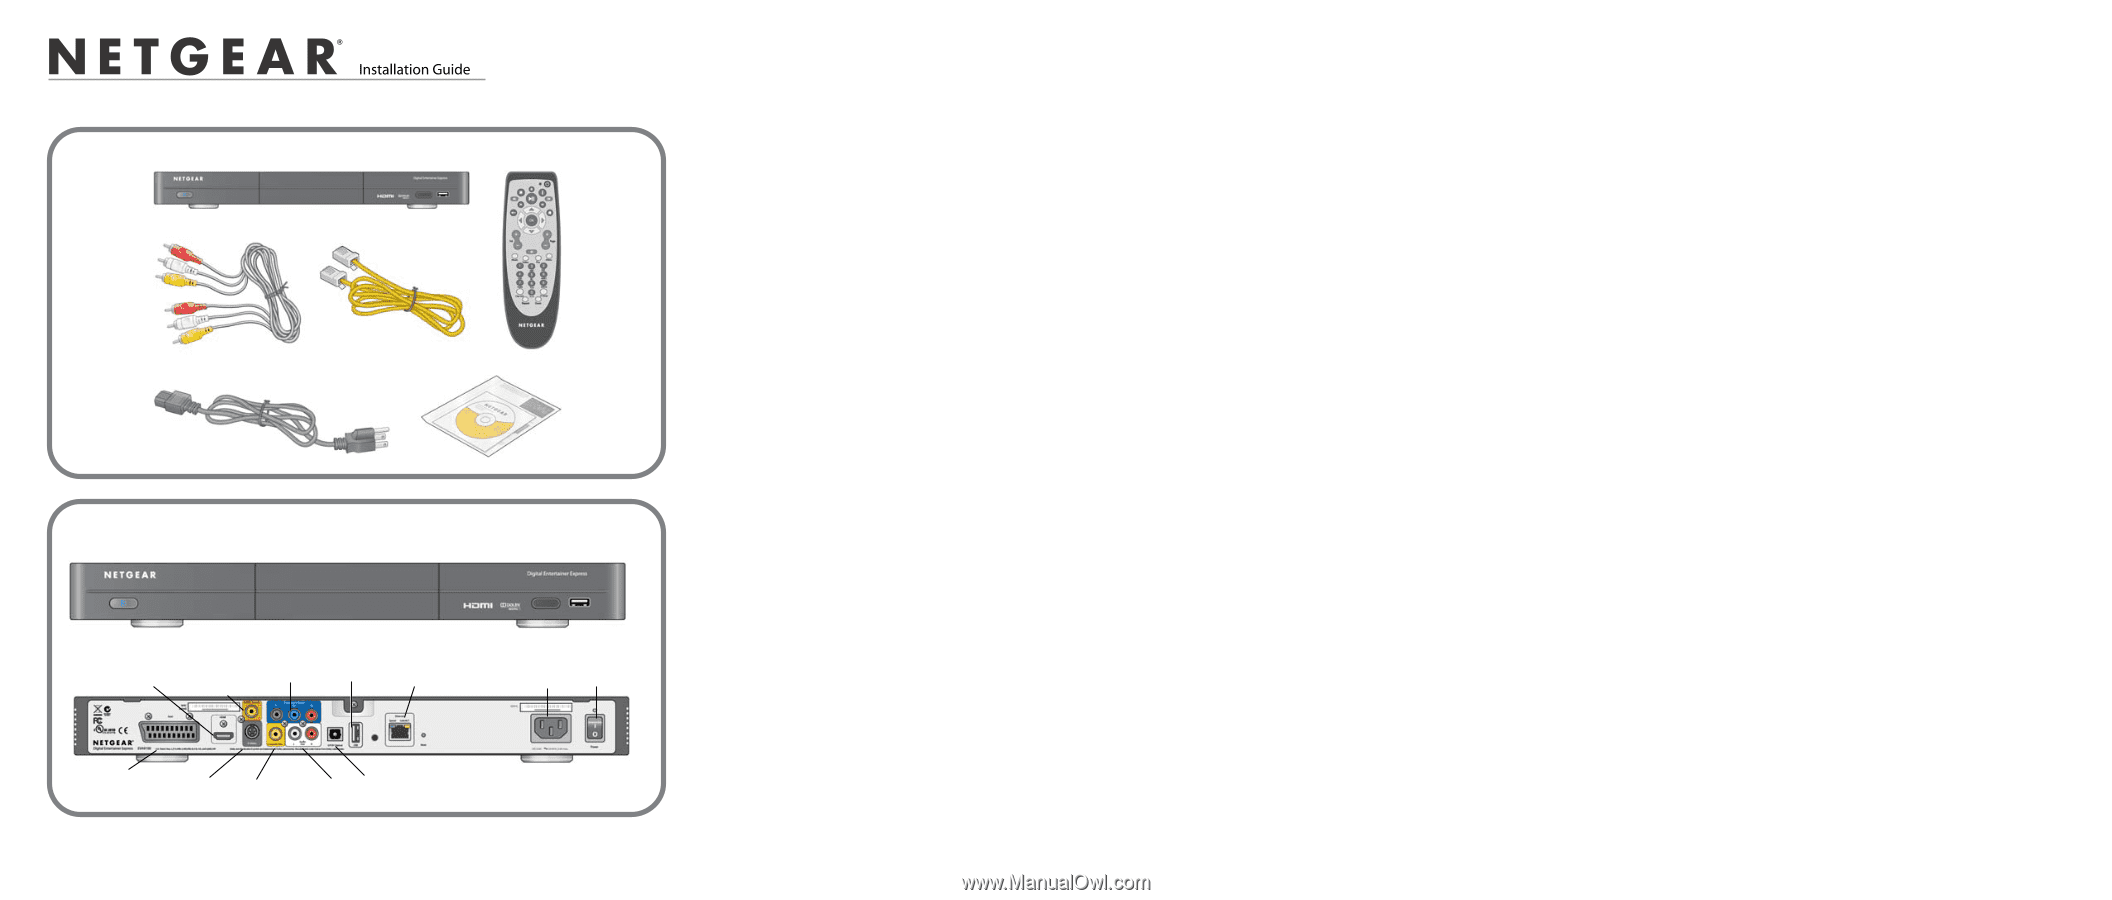
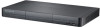
)NSTALLATION'UIDE Digital Entertainer Express Model EVA9100 Package Contents RCA audio/ composite video cable Digital Entertainer Express Ethernet cable Remote control Power cord Resource CD DE Express Front and Back Views HDMI S/PDIF coaxial (audio) Component USB Ethernet port video port with LEDs On/off Power switch SCART S-Video Composite Stereo S/PDIF optical video audio (audio) This guide explains how to install the Digital Entertainer Express using the basic setup; wired Ethernet LAN; and audio/composite video cable included in the package. HDMI and SCART cables are not included. For custom setup or component video connections, see the User Manual that is provided on your NETGEAR Resource CD, or download the latest documentation at http://www.NETGEAR.com/support. Install your DE Express in this order: 1. Connect the DE Express. 2. Set up the DE Express. 3. Install software on your computer with the NETGEAR Resource CD. 4. Configure your media library to work with the DE Express. Connecting the DE Express To connect the DE Express: 1. Connect the DE Express to your TV set and audio equipment using the RCA audio/composite cabled included with the DE Express. If you are using a digital audio/visual (a/v) receiver, use an S/PDIF coaxial or optical cable (not included) to connect it. 2. Connect the DE Express to the router with an Ethernet cable. 3. Connect the DE Express power cord, and plug it into an outlet. Make sure the on/off switch is set to on. The LED on the front of the DE Express blinks amber, then turns solid blue when it is powered on. 4. Install the two AA batteries (included) into the DE Express remote control. Setting Up the DE Express To set up the DE Express: 1. Turn on the TV. 2. Set the video source selector on your TV to match the connection from your DE Express. Note: If your TV has multiple inputs of a specific type (such as HDMI1 or HDMI2), make sure that you have selected the correctly numbered input. Check the instructions that came with your TV. 3. Check the TV display. If it is not clear, aim the remote control at the DE Express, and press TV Mode. You can cycle through the TV modes to get the best display. It can take 3 or 4 seconds for each TV mode change. 4. As part of the initial setup, you are prompted to select a language. 5. When you hear the audio welcome tune, press OK. If you do not hear the audio welcome message, check the connections to the Digital Entertainer Express. 6. Select Basic Setup, and then set up the TV resolution. 7. Select Video Mode, choosing one of the following analog modes: - Standard TV NTSC 480i (default) - Standard TV NTSC 480p (PAL) (your TV must support PAL settings) - Standard TV PAL 576i - Standard TV SCART PAL 576i - Standard TV PAL 576p 50Hz - Standard TV SCART PAL 576p 50Hz - HDTV Component 720p - HDTV Component 1080i - HDTV Component 1080p - HDTV Component 720p 50Hz - HDTV Component 1080i 50Hz - HDTV Component 1080p 50Hz 8. Depending on where you bought your DE Express, you might be prompted to enter your zip code or to choose your country and nearest city. If you want to receive weather information, enter your zip code. Press the down arrow when you are finished, and then press OK twice. 9. When prompted to install software, go to the computer where your media files are stored. Installing the Digital Entertainer Express for Windows Software After connecting the Digital Entertainer Express and completing basic setup, follow these steps to install the software: 1. Power on your computer, and log in as needed.
-
 1
1 -
 2
2
 |
 |