Netgear EX7000-1AZNAS Installation Guide
Netgear EX7000-1AZNAS Manual
 |
View all Netgear EX7000-1AZNAS manuals
Add to My Manuals
Save this manual to your list of manuals |
Netgear EX7000-1AZNAS manual content summary:
- Netgear EX7000-1AZNAS | Installation Guide - Page 1
Set Up the Access Point Nighthawk AC1900 WiFi Access Point Model EX7000 Quick Start Guide Ethernet cable Modem router or router Access point ¾¾ To set up the access point: 1. Use an Ethernet cable to connect your modem router or router - Netgear EX7000-1AZNAS | Installation Guide - Page 2
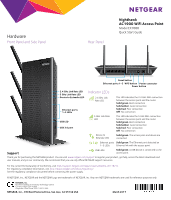
Rear Panel Nighthawk AC1900 WiFi Access Point Model EX7000 Quick Start Guide Reset button Ethernet ports 1-5 WPS button manuals, and join our community. We recommend that you use only official NETGEAR support resources. For the current EU Declaration of Conformity, visit http://support.netgear
-
 1
1 -
 2
2
 |
 |

Nighthawk
AC1900 WiFi Access Point
Model EX7000
Quick Start Guide
¾
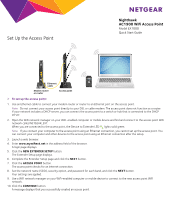
To set up the access point:
1.
Use an Ethernet cable to connect your modem router or router to an Ethernet port on the access point.
Note:
Do not connect your access point directly to your DSL or cable modem. The access point does not function as a router.
If your network includes a DHCP server, you can connect the access point to a switch or hub that is connected to the DHCP
server.
2.
Open the WiFi network manager on your WiFi-enabled computer or mobile device and find and connect to the access point WiFi
network called NETGEAR_EXT.
When you are connected to the access point, the Device to Extender LED
lights solid green.
Note:
If you connect your computer to the access point using an Ethernet connection, you cannot set up the access point. You
can connect your computer and other devices to the access point using an Ethernet connection aſter the setup.
3.
Launch a web browser.
4. Enter
www.mywifiext.net
in the address field of the browser.
A login page displays.
5. Click the
NEW EXTENDER SETUP
button.
The Extender Setup page displays.
6.
Complete the Extender Setup page and click the
NEXT
button.
7. Click the
ACCESS POINT
button.
The access point checks for an Internet connection.
8.
Set the network name (SSID), security option, and password for each band, and click the
NEXT
button.
Your settings are applied.
9.
Use a WiFi network manager on your WiFi-enabled computer or mobile device to connect to the new access point WiFi
network.
10. Click the
CONTINUE
button.
A message displays that you successfully created an access point.
Modem router
or router
Ethernet
cable
Access point
Set Up the Access Point