Netgear GA311 GA311 Installation Guide - Page 1
Netgear GA311 - Gigabit PCI Adapter Manual
 |
UPC - 606449033274
View all Netgear GA311 manuals
Add to My Manuals
Save this manual to your list of manuals |
Page 1 highlights
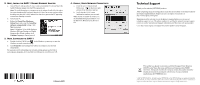
)NSTALLATION'UIDE NETGEAR 10/100/1000 Mbps Gigabit Ethernet Adapter GA311 Start Here Please refer to the Reference Manual on the NETGEAR Adapters Resource CD for instructions on Windows NT set up or advanced configuration options. Estimated Completion Time: 15 minutes. Verify that System Requirements are Met Before installing the GA311, please make sure that your computer meets the following minimum system requirements: • A PC with a Pentium® 300 MHz or higher compatible processor • One open 32-bit or 64-bit PCI slot • A CD-ROM drive • 64 MB of memory • Windows Vista, XP, 2000, Me, 98SE, NT 4.0 (with Service Pack 5 or above). Some versions of Windows may ask for the Windows operating system installation files to complete the installation of the GA311 driver software. • At least 5 Megabytes disk space. Note: Windows NT 4.0 does not permit installation of the software driver and utility software before installing the adapter. See the Reference Manual on the Resource CD for Windows NT 4.0 installation instructions. Windows Vista Installation 1. FIRST, INSTALL THE GA311 GIGABIT ETHERNET ADAPTER a. Turn off the PC and open the PC case. Locate an available PCI slot and insert the GA311 Ethernet Adapter into the PCI expansion slot. Note: To avoid damaging any components on the adapter, handle it by the edges. Use your thumbs to push it securely into the PCI slot. Do not use excessive force, but make sure the card is fully inserted into the slot to prevent the PC operating system from freezing at startup. b. Power on your PC, and let the operating system boot up completely. Log in as needed. 2. NEXT, INSTALL THE GA311 SOFTWARE a. Insert the NETGEAR Adapter Resource CD into your CD-ROM drive. The Resource CD main page will display. b. From the Windows Start menu, select Run. The Run dialog box will open. c. Enter the path to the GA311 setup.exe file on the CD. For example, if your CD-ROM is drive D, enter D:\GA311\setup as the path. Then, click OK. d. Follow the Install Shield Wizard steps. Click Finish when done. Remove the Resource CD. If prompted, restart your computer. Now, the GA311 driver and utility software are installed. 3. NOW, CONFIGURE THE GA311 a. Double-click the GA311 icon in the WIndows system tray to open the Windows network connection page. b. Click Properties and configure the GA311 according to your network requirements. For assistance with configuring your network settings, please see the link to networking in Appendix A of your Reference Manual on your Resource CD. 4. FINALLY, VERIFY NETWORK CONNECTIVITY c. Click the GA311 Smart Wizard Utility icon on the lower right portion of the Windows task bar. d. Verify that the GA311 status information matches your network. Note: If your are unable to connect, see the Troubleshooting section below or in the Reference Manual on the Resource CD. Windows XP, 2000, Me and 98SE Installation 1. FIRST, INSTALL THE GA311 SOFTWARE a. Power on your PC, and let the operating system boot up completely. Log in as needed. b. Insert the NETGEAR Adapter Resource CD into your CD-ROM drive. The Resource CD main page will display. c. From the Windows Start menu, select Run. The Run dialog box will open.Enter the path to the GA311 setup.exe file on the CD. For example, if your CD-ROM is drive D, enter D:\GA311\setup as the path. Then, click OK. d. Follow the Install Shield Wizard steps. Click Finish when done. Remove the Resource CD. If prompted, restart your computer. Now, the GA311 driver and utility software are installed.
-
 1
1 -
 2
2
 |
 |
