Netgear GA311 GA311 Installation Guide - Page 2
Technical Support - gigabit pci adapter
 |
UPC - 606449033274
View all Netgear GA311 manuals
Add to My Manuals
Save this manual to your list of manuals |
Page 2 highlights
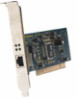
2. NEXT, INSTALL THE GA311 GIGABIT ETHERNET ADAPTER a. Turn off the PC and open the PC case. Locate an available PCI slot and insert the GA311 Ethernet Adapter into the PCI expansion slot. Note: To avoid damaging any components on the adapter, handle it by the edges. Use your thumbs to push it securely into the PCI slot. Do not use excessive force, but make sure the card is fully inserted into the slot to prevent the PC operating system from freezing at startup. b. Restart your PC. c. Follow the Found New Hardware Wizard steps and accept the Install the software automatically setting. Click Next to proceed Note: If Windows XP or 2000 displays a Windows XP Logo Testing or a Digital Signature Not Found warning, click Continue Anyway or Yes to proceed. 3. NOW, CONFIGURE THE GA311 a. Double-click the GA311 icon in the WIndows system tray to open the Windows network connection page. b. Click Properties and configure the GA311 according to your network requirements. For assistance with configuring your network settings, please see the link to networking in Appendix A of your Reference Manual on your Resource CD. 4. FINALLY, VERIFY NETWORK CONNECTIVITY a. Click the GA311 Smart Wizard Utility icon on the lower right portion of the Windows task bar. b. Verify that the GA311 status information matches your network. Note: If your are unable to connect, see the Troubleshooting section below or in the Reference Manual on the Resource CD. February 2007 Technical Support Thank you for selecting NETGEAR products. After completing setup and configuration, locate the serial number on the bottom label of the GA311 Gigabit Ethernet Adapter and use it to register your product at http://www.netgear.com/register. Registration on the web site or over the phone is required before you can use our telephone support service. The phone numbers for worldwide regional customer support centers are on the Warranty and Support Information card that came with your product. Go to http://www.netgear.com/support for product updates and web support. This symbol was placed in accordance with the European Union Directive 2002/96 on the Waste Electrical and Electronic Equipment (the WEEE Directive). If disposed of within the European Union, this product should be treated and recycled in accordance with the laws of your jurisdiction implementing the WEEE Directive. © 2007 by NETGEAR, Inc. All rights reserved. NETGEAR and the NETGEAR logo are registered trademarks of NETGEAR, Inc. in the United States and/or other countries. Other brand and product names are trademarks or registered trademarks of their respective holders. Information is subject to change without notice.
-
 1
1 -
 2
2
 |
 |
