Netgear GS724TS GS7xxTS User Manual - Page 100
LAG Membership
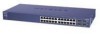 |
UPC - 606449049442
View all Netgear GS724TS manuals
Add to My Manuals
Save this manual to your list of manuals |
Page 100 highlights
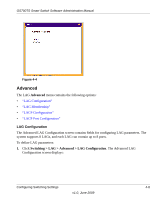
GS700TS Smart Switch Software Administration Manual LAG Membership The Basic LAG Membership screen allows network managers to assign ports to LAGs. To assign ports to LAGs: 1. Click Switching > LAG > Basic > LAG Membership. The Basic LAG Membership screen displays: Figure 4-3 The Basic LAG Membership screen contains the following fields: • LAG ID - Select the LAG ID. • LAG Name - Displays the user-defined LAG name. • LAG Type - Select the LAG type. The possible field values are: - Static - Indicates the LAG is configured manually. - LACP - Indicates the LAG is configured dynamically. 2. Select the LAG ID and LAG Type. 3. Click on the unit's gold button. The unit's port panel displays. 4. Select the ports to be members of the LAG. 5. Click APPLY to update the device. 6. Click CURRENT MEMBERS. The Current Members window opens and displays the member ports included in the LAG: 4-7 Configuring Switching Settings v1.0, June 2009
-
 1
1 -
2
-
3
-
4
-
5
-
6
-
7
-
8
-
9
-
10
-
11
-
12
-
13
-
14
-
15
-
16
-
17
-
18
-
19
-
20
-
21
-
22
-
23
-
24
-
25
-
26
-
27
-
28
-
29
-
30
-
31
-
32
-
33
-
34
-
35
-
36
-
37
-
38
-
39
-
40
-
41
-
42
-
43
-
44
-
45
-
46
-
47
-
48
-
49
-
50
-
51
-
52
-
53
-
54
-
55
-
56
-
57
-
58
-
59
-
60
-
61
-
62
-
63
-
64
-
65
-
66
-
67
-
68
-
69
-
70
-
71
-
72
-
73
-
74
-
75
-
76
-
77
-
78
-
79
-
80
-
81
-
82
-
83
-
84
-
85
-
86
-
87
-
88
-
89
-
90
-
91
-
92
-
93
-
94
-
 95
95 -
 96
96 -
 97
97 -
 98
98 -
 99
99 -
 100
100 -
 101
101 -
 102
102 -
 103
103 -
 104
104 -
 105
105 -
106
-
107
-
108
-
109
-
110
-
111
-
112
-
113
-
114
-
115
-
116
-
117
-
118
-
119
-
120
-
121
-
122
-
123
-
124
-
125
-
126
-
127
-
128
-
129
-
130
-
131
-
132
-
133
-
134
-
135
-
136
-
137
-
138
-
139
-
140
-
141
-
142
-
143
-
144
-
145
-
146
-
147
-
148
-
149
-
150
-
151
-
152
-
153
-
154
-
155
-
156
-
157
-
158
-
159
-
160
-
161
-
162
-
163
-
164
-
165
-
166
-
167
-
168
-
169
-
170
-
171
-
172
-
173
-
174
-
175
-
176
-
177
-
178
-
179
-
180
-
181
-
182
-
183
-
184
-
185
-
186
-
187
-
188
-
189
-
190
-
191
-
192
-
193
-
194
-
195
-
196
-
197
-
198
-
199
-
200
-
201
-
202
-
203
-
204
-
205
-
206
-
207
-
208
-
209
-
210
-
211
-
212
-
213
-
214
-
215
-
216
-
217
-
218
-
219
-
220
-
221
-
222
-
223
-
224
-
225
-
226
-
227
-
228
-
229
-
230
-
231
-
232
 |
 |
