Netgear GSM7352Sv1 7000 Series Managed Switch Administration Guide for Softwar - Page 306
Enable SNMP Trap, CLI: Enabling SNMP Trap, Web Interface: Enabling SNMP Trap
 |
View all Netgear GSM7352Sv1 manuals
Add to My Manuals
Save this manual to your list of manuals |
Page 306 highlights
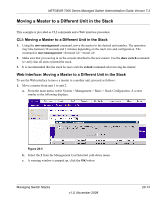
NETGEAR 7000 Series Managed Switch Administration Guide Version 7.3 3. In the Client Address field, enter 0.0.0.0. 4. In the Client IP Mask field, enter 0.0.0.0. 5. Select the Read/Write from the Access Mode pull-down menu. 6. Select the Enable from the Status pull-down menu. 7. Click the Add. Enable SNMP Trap The example is shown as CLI commands and as a Web interface procedure. CLI: Enabling SNMP Trap This example shows how to send SNMP trap to the SNMP server. (Netgear switch) #config (Netgear switch) (Config)# snmptrap public 10.100.5.17 Enable send trap to SNMP server 10.100.5.17 (Netgear switch) (Config)#snmp-server traps linkmode Enable send link status to the SNMP server when link status changes. Web Interface: Enabling SNMP Trap To use the Web interface to add a new community, proceed as follows: 1. Enable send SNMP trap to the server 10.100.5.17. a. From the main menu, select System > SNMP>SNMP V1/V2>Trap Configuration. A screen similar to the following displays. Figure 21-2 b. In the Community Name field, enter public. c. Select SNMPv1 from the Version pull-down menu. 21-2 v1.0, November 2008 SNMP
-
 1
1 -
2
-
3
-
4
-
5
-
6
-
7
-
8
-
9
-
10
-
11
-
12
-
13
-
14
-
15
-
16
-
17
-
18
-
19
-
20
-
21
-
22
-
23
-
24
-
25
-
26
-
27
-
28
-
29
-
30
-
31
-
32
-
33
-
34
-
35
-
36
-
37
-
38
-
39
-
40
-
41
-
42
-
43
-
44
-
45
-
46
-
47
-
48
-
49
-
50
-
51
-
52
-
53
-
54
-
55
-
56
-
57
-
58
-
59
-
60
-
61
-
62
-
63
-
64
-
65
-
66
-
67
-
68
-
69
-
70
-
71
-
72
-
73
-
74
-
75
-
76
-
77
-
78
-
79
-
80
-
81
-
82
-
83
-
84
-
85
-
86
-
87
-
88
-
89
-
90
-
91
-
92
-
93
-
94
-
95
-
96
-
97
-
98
-
99
-
100
-
101
-
102
-
103
-
104
-
105
-
106
-
107
-
108
-
109
-
110
-
111
-
112
-
113
-
114
-
115
-
116
-
117
-
118
-
119
-
120
-
121
-
122
-
123
-
124
-
125
-
126
-
127
-
128
-
129
-
130
-
131
-
132
-
133
-
134
-
135
-
136
-
137
-
138
-
139
-
140
-
141
-
142
-
143
-
144
-
145
-
146
-
147
-
148
-
149
-
150
-
151
-
152
-
153
-
154
-
155
-
156
-
157
-
158
-
159
-
160
-
161
-
162
-
163
-
164
-
165
-
166
-
167
-
168
-
169
-
170
-
171
-
172
-
173
-
174
-
175
-
176
-
177
-
178
-
179
-
180
-
181
-
182
-
183
-
184
-
185
-
186
-
187
-
188
-
189
-
190
-
191
-
192
-
193
-
194
-
195
-
196
-
197
-
198
-
199
-
200
-
201
-
202
-
203
-
204
-
205
-
206
-
207
-
208
-
209
-
210
-
211
-
212
-
213
-
214
-
215
-
216
-
217
-
218
-
219
-
220
-
221
-
222
-
223
-
224
-
225
-
226
-
227
-
228
-
229
-
230
-
231
-
232
-
233
-
234
-
235
-
236
-
237
-
238
-
239
-
240
-
241
-
242
-
243
-
244
-
245
-
246
-
247
-
248
-
249
-
250
-
251
-
252
-
253
-
254
-
255
-
256
-
257
-
258
-
259
-
260
-
261
-
262
-
263
-
264
-
265
-
266
-
267
-
268
-
269
-
270
-
271
-
272
-
273
-
274
-
275
-
276
-
277
-
278
-
279
-
280
-
281
-
282
-
283
-
284
-
285
-
286
-
287
-
288
-
289
-
290
-
291
-
292
-
293
-
294
-
295
-
296
-
297
-
298
-
299
-
300
-
 301
301 -
 302
302 -
 303
303 -
 304
304 -
 305
305 -
 306
306 -
 307
307 -
 308
308 -
 309
309 -
 310
310 -
 311
311 -
312
-
313
-
314
-
315
-
316
-
317
-
318
-
319
-
320
-
321
-
322
-
323
-
324
-
325
-
326
-
327
-
328
-
329
-
330
-
331
-
332
-
333
-
334
-
335
-
336
-
337
-
338
-
339
-
340
-
341
-
342
-
343
-
344
 |
 |
