Netgear MS2120 STORA Install Guide - Page 1
Netgear MS2120 - Stora Media Center Manual
 |
UPC - 606449071467
View all Netgear MS2120 manuals
Add to My Manuals
Save this manual to your list of manuals |
Page 1 highlights
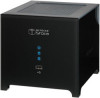
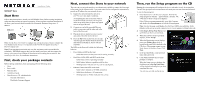
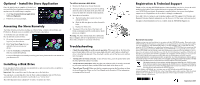
Installation Guide NETGEAR® Stora Start Here Follow these instructions to install your NETGEAR® Stora. Before starting installation, make sure that you have an Internet connection. When you have completed installation of the Stora, your network should resemble this illustration. Estimated setup time: 15 minutes. USB port Note: See the Stora User Guide to configure any advanced features. There is a link to the User Guide on your Resource CD and also on the NETGEAR support site at http:// kbserver.netgear.com Note: If you purchased a unit with only one disk, and want to add a second disk for redundancy, NETGEAR suggests that you first install your Stora, and then connect the Stora to your network and validate the installation before adding the second disk. See Installing a Disk Drive for installation instructions. First, check your package contents Before starting installation, check your package for the following items: • Stora • Power cable • Ethernet cable • Installation Guide • Stora Resource CD, which includes: - Warranty Information - Worldwide Customer Support Next, connect the Stora to your network The router in your network must have an ethernet port available to connect the Stora unit to the router via the Ethernet cable. Your router must also be configured to automatically provide an IP address for your network devices. 1. Unpack the unit and stand the unit on its feet-be sure it has ample ventilation. Avoid putting the unit in a location where it could be knocked over easily. Do not place items on top of the Stora, or place any liquids near or on top of the unit. 2. Connect one end of the provided Ethernet cable to your router and the other end to the back of the Stora unit. Power supply 3. Plug in the power adapter to a power source and connect the other end to the unit. 4. Press the On button on the back of your unit. The blue light will flicker while the unit boots and obtains an IP address; then it will turn solid blue. The LEDs on the Stora will exhibit the following behavior: • Power indicator LED on the front: - Solid Blue: Stora unit has power and is running normally. • Hard Drive LEDs (HD1 and HD2) on the front: - Solid Green: Drive is operating normally. - Solid Amber: Indicates a problem with the drive. - Blinking Green: Indicates activity, such as copying data. • Ethernet Connection LEDs on the back: - Solid Amber: Indicates a 10/100M connection. - Solid Green: Indicates a 1G connection. - Blinking Green or Amber: Indicates link activity. Then, run the Setup program on the CD Running the setup program will configure the device and make it ready for storing data. You will also give your unit a unique name, and create your own user name and password. To run the Setup program: 1. Insert the Resource CD into your computer. Wait for the Setup program to initialize-approximately 2 minutes. The "Welcome to Stora" setup screen displays. If the CD does not start automatically, go to My Computer and double-click StoraSetup.exe to start the Setup program. Note: An error message could display if a) the Power LED is not solid blue, b) the Ethernet cables are not securely connected, or c) if your computer is behind a firewall. 2. Click Step 1, Set Up Your Stora to set up the Stora so that it can store data. 3. When the software license agreement displays, click I Accept. 4. When the Registration screen displays, enter your Product Key, which is located on the small label attached to the CD sleeve. Then assign a name to your Stora, known as the Stora Name. Click Next. 5. In the provided fields, create your user name and a password. 6. Click Next and follow the on-screen prompts to complete. When the Setup screen re-displays, the checkbox next to Set Up Your Stora will be checked indicating that you have completed this step You can now exit and use the device.
-
 1
1 -
 2
2
 |
 |