Netgear MS2120 STORA Install Guide - Page 2
Optional - Install the Stora Application, Accessing the Stora Remotely, Installing a Disk Drive,
 |
UPC - 606449071467
View all Netgear MS2120 manuals
Add to My Manuals
Save this manual to your list of manuals |
Page 2 highlights
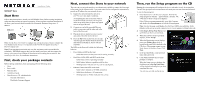
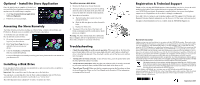
Optional - Install the Stora Application Once the initial setup is complete, if desired, you can install the Stora Application software now, or anytime once the initial setup is complete: 1. Click Step 2 Install Desktop Applications Software (Optional) 2. Follow the on-screen prompts. Accessing the Stora Remotely The folder structure in the Stora includes an Albums folder, a Media Library folder, and Preferences. Remote access is available with a Premium subscription. To verify that you can remotely copy files to and from your new Stora: 1. Go to http://www.mystora.com and log in to your Stora device. 2. Enter Your Stora Name that you selected when you set up your device. 3. Enter the Username and Password that you created during Setup. For more information on remotely accessing your Stora, please see the User Manual on your Resource CD. Installing a Disk Drive If you purchased a Stora with only one installed drive, and you want to add a second drive, carefully follow these instructions. Important: The second drive must be the same size as the first drive. You can insert a second disk drive into the Stora without turning the unit off. The Stora automatically detects the second drive and builds it as a "mirror drive." The following instructions explain how to replace or install a new drive. To add or remove a disk drive: 1. Remove the front cover of your Stora unit. 2. If you are replacing a drive, unlock it by pulling down the latch on the back of the unit. This will release the hard drive from the locked position. 3. Insert the new hard drive. a. The label on the drive needs to face the outside of the unit. b. Slide the disk into place in either slot until it locks. c. Replace the front cover. 4. The green LED on the front of the Stora will blink continuously until the installed drive build process is complete. Warning: The Stora formats hard drives differently than a computer. Do not swap hard drives between a Stora and a computer or your data will be lost. Troubleshooting • Check the status lights to verify correct operation. When powered on, the Stora blue power button light will be on. Green status lights labeled 1 and 2 indicate which hard drive is installed and detected. If the drive light is amber, turn off the Stora unti, and then turn it on again. • Turning off Your Stora correctly. To turn off your Stora, press the power button until the blue light blinks (about 5 seconds). • Verify Ethernet connection. Make sure that your Ethernet cable is securely connected to your router and to the Stora, and the LEDs on the back of the Stora are lit. • Turn off your Firewall. Make sure that the computer accessing the Stora does not have its firewall turned on. Please see the User Manual on the Resource CD for information on turning off the firewall. Registration & Technical Support Thank you for selecting NETGEAR products. After installing your device, locate the serial number on the label of your product and use it to register your product at http:// www.NETGEAR.com/register. Registration is required before you can use our telephone support service. Registration via our website is strongly recommended. Go to http://kbserver.netgear.com for product updates and Web support. For Warranty and Regional Customer Support information, see the Resource CD that came with your product. An approved hard disk hardware list is available from the NETGEAR Support site. Hard Drive Disclaimer Adding or using your own hard drive(s) is an option with this NETGEAR product. Please refer to the NETGEAR ReadyNAS hard drive compatibility list for qualified drives when selecting and installing your own hard drive(s). This NETGEAR product is not data redundant with a single disk drive. By using this NETGEAR product, you understand and agree that (i) NETGEAR does not warrant any disk drive not provided or installed by NETGEAR; and (ii) NETGEAR is not responsible and you hereby release NETGEAR from any liability under any circumstances whatsoever for any damage to, loss of data or loss of contents of any hard drive use with this NETGEAR product, regardless of whether such hard drive is provided by NETGEAR or qualified to be compatible with this product. In no event will NETGEAR's liability with respect to a failed disk drive or failed product exceed the cost of a replacement disk drive or replacement product, as applicable. In certain circumstances data loss may be permanent and unrecoverable and therefore you are highly encouraged to separately maintain a backup copy of any data that you store on the hard drive(s) used with this NETGEAR product. This symbol was placed in accordance with the European Union Directive 2002/96 on the Waste Electrical and Electronic Equipment (the WEEE Directive). If disposed of within the European Union, this product should be treated and recycled in accordance with the laws of your jurisdiction implementing the WEEE Directive. © 2008, 2009 by NETGEAR, Inc. All rights reserved. NETGEAR and the NETGEAR logo are registered trademarks of NETGEAR, Inc. in the United States and/or other countries. Other brand and product names are trademarks or registered trademarks of their respective holders. Information is subject to change without notice. September 2009
-
 1
1 -
 2
2
 |
 |
