Netgear RN10200 Hardware Manual - Page 80
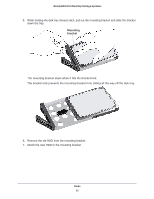
While holding the release latch, use your other hand to pull out one end of
 |
View all Netgear RN10200 manuals
Add to My Manuals
Save this manual to your list of manuals |
Page 80 highlights
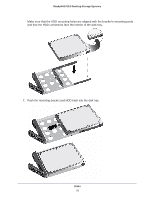
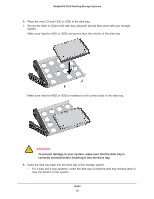
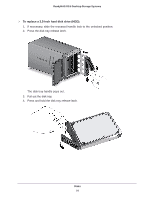
ReadyNAS OS 6 Desktop Storage Systems 3. Press the disk tray release latch. The disk tray handle pops out. 4. Pull out the disk tray. 5. Remove the mounting bracket from the disk tray: a. Press and hold the disk tray release latch. b. While holding the release latch, use your other hand to pull out one end of the mounting bracket and then the other until the ends extend slightly past the disk tray. Make sure that the ends of the mounting bracket are even with each other. Disks 80
-
 1
1 -
2
-
3
-
4
-
5
-
6
-
7
-
8
-
9
-
10
-
11
-
12
-
13
-
14
-
15
-
16
-
17
-
18
-
19
-
20
-
21
-
22
-
23
-
24
-
25
-
26
-
27
-
28
-
29
-
30
-
31
-
32
-
33
-
34
-
35
-
36
-
37
-
38
-
39
-
40
-
41
-
42
-
43
-
44
-
45
-
46
-
47
-
48
-
49
-
50
-
51
-
52
-
53
-
54
-
55
-
56
-
57
-
58
-
59
-
60
-
61
-
62
-
63
-
64
-
65
-
66
-
67
-
68
-
69
-
70
-
71
-
72
-
73
-
74
-
 75
75 -
 76
76 -
 77
77 -
 78
78 -
 79
79 -
 80
80 -
 81
81 -
 82
82 -
 83
83 -
 84
84 -
 85
85 -
86
-
87
-
88
-
89
-
90
-
91
-
92
-
93
-
94
-
95
-
96
-
97
-
98
-
99
-
100
-
101
-
102
-
103
-
104
-
105
-
106
-
107
 |
 |

Disks
80
ReadyNAS OS 6 Desktop Storage Systems
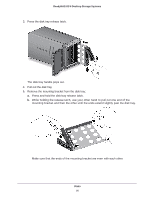
3.
Press the disk tray release latch.
The disk tray handle pops out.
4.
Pull out the disk tray.
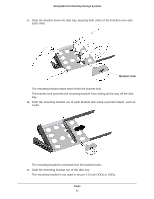
5.
Remove the mounting bracket from the disk tray:
a.
Press and hold the disk tray release latch.
b.
While holding the release latch, use your other hand to pull out one end of the
mounting bracket and then the other until the ends extend slightly past the disk tray.
Make sure that the ends of the mounting bracket are even with each other.