Netgear RND4000 RND4000 Setup Manual - Page 5
Installing the RAIDar Utility, Installing RAIDar on Windows
 |
UPC - 606449053272
View all Netgear RND4000 manuals
Add to My Manuals
Save this manual to your list of manuals |
Page 5 highlights
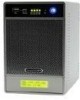
Installing the RAIDar Utility This Setup Manual provides instructions for connecting the ReadyNAS to your network ( "Installing the RAIDar Utility" on page 1) and for configuring the device for your network (see "Using the FrontView Setup Wizard" on page 5). Before installing the RAIDar Utility, please note that: • RAIDar, a utility used for discovering the ReadyNAS device on your network, is located on the ReadyNAS Installation CD. RAIDar is useful in environments where the ReadyNAS obtains a random DHCP IP address. • RAIDar runs on Windows, Mac OS X, and Linux, and takes up approximately 40MB of disk space after installation. • Your client system must reside on the same IP address subnet. It is forbidden by law to view, copy, broadcast, use, show or share copyrighted material without the express permission of the copyright owner. You are solely responsible to obtain the appropriate permission or license necessary for any copyrighted materials accessed or used with this device. Installing RAIDar on Windows Load the Installation CD. Follow the installation wizard to install RAIDar. (If the Autorun installation utility does not start automatically, double-click Autorun.exe to start the installation.) Installing RAIDar on MAC OS X 1. Load the Installation CD, open the Mac RAIDar Setup folder and double-click Setup_Mac.dmg to start the installation. The RAIDar Installer icon will display on your desktop. 2. Double-click the icon and follow the installer instructions to install RAIDar. Alternatively, you can install a thin RAIDar widget for your Dashboard. You can download this widget from the NETGEAR support at: http://www.netgear.com/support. 1
-
 1
1 -
 2
2 -
 3
3 -
 4
4 -
 5
5 -
 6
6 -
 7
7 -
 8
8 -
 9
9 -
 10
10 -
 11
11 -
12
-
13
-
14
-
15
-
16
-
17
-
18
-
19
-
20
-
21
-
22
-
23
-
24
 |
 |
