Netgear RND4000 RND4000 Setup Manual - Page 6
Installing RAIDar on Linux, Detecting Your ReadyNAS Device, nmblookup -R, VOLUME., admin - readynas nv
 |
UPC - 606449053272
View all Netgear RND4000 manuals
Add to My Manuals
Save this manual to your list of manuals |
Page 6 highlights
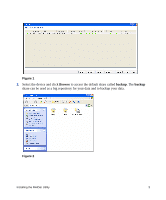
Installing RAIDar on Linux Log in as root. Load the Installation CD, open the Linux RAIDar setup folder, and double-click on Setup_Linux.sh to start the installation. If you have problems running RAIDar under Linux: • To discover the IP address of ReadyNAS, open a terminal session and type nmblookup -R VOLUME. If you have a ReadyNAS with an LCD (such as the ReadyNAS NV+), press the power button once to display the IP address. • To connect to the FrontView Setup Wizard, open a browser, and use the returned IP address to enter http:///admin. Then, go to Step 2 in"Detecting Your ReadyNAS Device" on page 2. • If you already have an existing workgroup or domain in your environment, ReadyNAS will try to locate that name. If VOLUME does not work, try using the workgroup/domain name used on your network in the nmblookup command. Detecting Your ReadyNAS Device Before using the RAIDar utility to detect your device, power on ReadyNAS and wait for it to boot up (approximately 2 minutes). If you are connecting a PC directly to ReadyNAS (and not through a network), first set a static IP address on your PC in the 192.168.168.xxx subnet, subnet mask 255.255.255.0. You can then use RAIDar to detect ReadyNAS, or open a browser and enter the ReadyNAS default IP Address of https://192.168.168.168/admin. To detect your ReadyNAS device: 1. Invoke RAIDar by clicking on the RAIDar icon on your desktop. Your ReadyNAS device will be detected when the device has successfully booted and has started a network connection. If you have multiple ReadyNAS devices on your network, match the MAC Address of the system to the address listed on the back of your ReadyNAS device. 2 Installing the RAIDar Utility
-
 1
1 -
 2
2 -
 3
3 -
 4
4 -
 5
5 -
 6
6 -
 7
7 -
 8
8 -
 9
9 -
 10
10 -
 11
11 -
 12
12 -
13
-
14
-
15
-
16
-
17
-
18
-
19
-
20
-
21
-
22
-
23
-
24
 |
 |