Netgear RNDU4000 Hardware Manual - Page 33
Failed Disk Notification, Replacing a Disk - readynas ultra
 |
View all Netgear RNDU4000 manuals
Add to My Manuals
Save this manual to your list of manuals |
Page 33 highlights
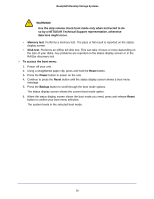
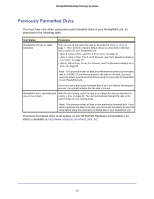
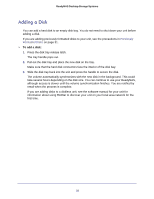
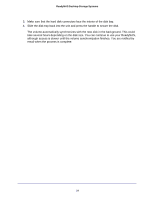
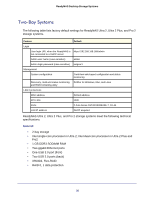
ReadyNAS Desktop Storage Systems Failed Disk Notification If a disk fails in your ReadyNAS, you are notified by email. Email alerts must be set up for notifications to be sent. In addition, FrontView provides information about the failed disk. NETGEAR recommends replacing a failed disk with the same disk model. Use FrontView to determine the disk vendor and model used in your unit. For information about setting up email alerts and using FrontView for the ReadyNAS Ultra series, see the appropriate software manual for your unit. Manuals are available at http://www.readynas.com/documentation. WARNING! No matter how many hard drives are installed in your unit, ensure that all drive trays remain in the drive bays to maintain adequate airflow. Replacing a Disk In the case of a failed disk, the unit provides email alerts and status messages about the need to replace a disk. ReadyNAS supports hot-swap bays, so you do not need to power down your unit when replacing a disk. If you are replacing a disk with a previously formatted disk, see the precautions in Previously Formatted Disks on page 31. To replace a disk: 1. Press the disk tray pull release latch. The disk tray handle pops out. 2. Pull out the disk tray and replace the disk. 2 3 1 1. Disk 2. Empty disk tray 3. Assembled disk and tray 33
-
 1
1 -
2
-
3
-
4
-
5
-
6
-
7
-
8
-
9
-
10
-
11
-
12
-
13
-
14
-
15
-
16
-
17
-
18
-
19
-
20
-
21
-
22
-
23
-
24
-
25
-
26
-
27
-
 28
28 -
 29
29 -
 30
30 -
 31
31 -
 32
32 -
 33
33 -
 34
34 -
 35
35 -
 36
36 -
 37
37 -
 38
38 -
39
-
40
-
41
-
42
-
43
-
44
-
45
-
46
-
47
-
48
 |
 |