Netgear SRX5308 Generating a Self Certificate Request Using OpenSSL - Page 3
Create an Active Self, Conclusion - certificate
 |
UPC - 606449065145
View all Netgear SRX5308 manuals
Add to My Manuals
Save this manual to your list of manuals |
Page 3 highlights
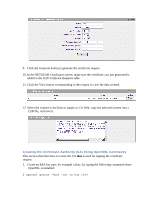
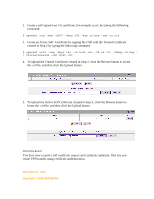
2. Create a self-signed root CA certificate, for example ca.crt, by typing the following command: $ openssl req -new -x509 -days 365 -key ca.key -out ca.crt 3. Create an Active Self Certificate by signing the CSR with the Trusted Certificate created in Step 2 by typing the following command: $ openssl x509 -req -days 182 -in host.csr -CA ca.crt -CAkey ca.key - \ Cacreateserial -out host.crt 4. To upload the Trusted Certificate created in Step 2, click the Browse button to locate the .crt file, and then click the Upload button. 5. To upload the Active Self Certificate created in Step 3, click the Browse button to locate the .crt file, and then click the Upload button Conclusion You have now created a self certificate request and certificate authority. This lets you create VPN tunnels using certificate authentication. November 27, 2006 Copyright © 2006 NETGEAR®
-
 1
1 -
 2
2 -
 3
3
 |
 |
