Netgear WNA3100 WNA3100 User Manual - Page 21
Network Connections and Wireless Security, Viewing Wireless Networks in Your Area - installation software
 |
UPC - 606449067774
View all Netgear WNA3100 manuals
Add to My Manuals
Save this manual to your list of manuals |
Page 21 highlights
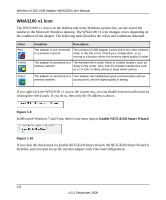
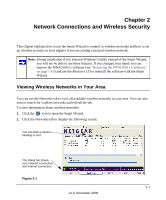
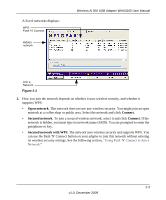
Chapter 2 Network Connections and Wireless Security This chapter explains how to use the Smart Wizard to connect to wireless networks and how to set up wireless security on your adpater if you are joining a secured wireless network. Note: During installation if you selected Windows Utililty instead of the Smart Wizard, you will not be able to use these features. If you changed your mind, you can remove the WNA3100 v1 software (see "Removing the WNA3100 v1 Software" on page 1-10) and use the Resource CD to reinstall the software with the Smart Wizard. Viewing Wireless Networks in Your Area You can use the Networks tab to view all available wireless networks in your area. You can also scan to search for wireless networks and refresh the tab. To view information about wireless networks: 1. Click the icon to open the Smart Wizard. 2. Click the Networks tab to display the following screen: You can click a column heading to sort. T. he status bar shows your network connection and Internet connection. Figure 2-1 2-1 v1.0, December 2009
-
 1
1 -
2
-
3
-
4
-
5
-
6
-
7
-
8
-
9
-
10
-
11
-
12
-
13
-
14
-
15
-
 16
16 -
 17
17 -
 18
18 -
 19
19 -
 20
20 -
 21
21 -
 22
22 -
 23
23 -
 24
24 -
 25
25 -
 26
26 -
27
-
28
-
29
-
30
-
31
-
32
-
33
-
34
-
35
-
36
-
37
-
38
-
39
-
40
-
41
-
42
-
43
-
44
-
45
-
46
-
47
-
48
 |
 |