Netgear WNHD3004 WNHD3004 Install Guide - Page 1
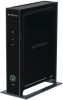
Netgear WNHD3004 - High Performance Wireless-N HD Home Theatre Adapter Manual
 |
View all Netgear WNHD3004 manuals
Add to My Manuals
Save this manual to your list of manuals |
Page 1 highlights
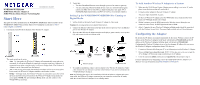
Installation Guide TWNHD3004/WNHDB3004 3DHD Home Theater Adapter & 3DHD Wireless Home Theater Networking Kit Start Here This guide describes installation for the WNHD3004 3DHD Home Theater Adapter or the WNHDB3004 3DHD Wireless Home Theater Networking Kit. Learn more at http:// www.netgear.com/3DHD. 1. Familiarize yourself with the features of the Wireless-N Adapter. The mode switch can be set to: • Auto - In Auto mode, the Wireless-N Adapter will automatically sense and set its own mode. It will run in AP mode if connected to a router or gateway. Otherwise, if connected to any other wired device(s), it will run in Bridge mode. (The Wireless-N Adapter is set to Auto mode from the factory.) • AP - In AP (access point) mode, the Wireless-N Adapter will act as an access point. In this mode, the Wireless-N Adapter should be connected to a router. • Bridge - In Bridge mode, the Wireless-N Adapter is connected to your other wired device(s) and will connect wirelessly to the Wireless-N Adapter being used as an access point. NOTE: The unit running in Bridge mode can only connect to the WNHD3004 Access Point. 2. Verify that: • You have Broadband Internet access through a powered-on router or gateway. • You are connecting Ethernet-enabled devices, such as a network-enabled game console (an XBox 360 or Sony PS3), a digital media player (an Apple TV or NETGEAR Digital Entertainer), an IPTV set-top box, or a personal computer. Setting Up the WNHD3004/WNHDB3004 For Gaming or Digital Media 1. Set the switch on the back of each Wireless-N Adapter to Auto mode. Caution: Do not plug in the power adapter before step 2. 2. Connect the Ethernet cable from a LAN port in the router or gateway (A) to an Ethernet port on one Wireless-N Adapter. 3. Place the other Wireless-N Adapter near the media player, game console, or set-top box (B), and connect it with an Ethernet cable. Desktop PC Gaming console Internet Router/gateway A WNHDB3004 B DMA Network TV viewer/DVR Network storage Digital set-top box 4. To complete installation, connect a power adapter to the Wireless-N Adapter(s). Allow a few minutes for your devices to connect to the Internet. If you are not connected, see "Troubleshooting" on page 2. Note: By following the steps in this installation with both Wireless-N Adapter units set to Auto mode, the Wireless-N Adapter connected to your router has set itself to AP mode, while the second Wireless-N Adapter is set to Bridge mode. To Add Another Wireless-N Adapter to a System 1. Make sure the 3DHD Home Theater Adapter you are adding is not set to AP mode, place it near the devices that will work with it. 2. Connect a power adapter to the new Wireless-N Adapter. The power light should blink in green. 3. On the new Wireless-N Adapter, press the WPS button once (located on the front panel). Its WPS light should start to blink. 4. Within 2 minutes, press the WPS button on the Wireless Access Point (the one connected to the router). Its WPS light should start to blink. 5. After 1-2 minutes the new Wireless-N Adapter in Bridge mode should be associated with the Wireless Access Point. The power lights on both units will be solid green. Configuring the Adapter By default, the IP address is assigned dynamically by the router. Without a router, the IP address of the Wireless-N Adapter in AP mode will default to 192.168.1.240 and the IP address of the Wireless-N Adapter in bridge mode will default to 192.168.1.241. Configuring the Wireless-N Adapter to use a fixed or dynamic IP address lets you access the Wireless-N Adapter configuration from a Web browser. 1. Connect an Ethernet cable from your PC to an Ethernet port on the Wireless-N Adapter. 2. Browse to http://www.mywifiext.com. NOTE: If this does not work, you can get the AP or Bridge's IP from your router, and browse to its IP address. 3. Enter the username admin and the password password at the prompt to log in. For more information on configuring, refer to the 3DHD Home Theater Adapter User Manual. You can download it from http://netgear.com/support.
-
 1
1 -
 2
2
 |
 |
