Netgear WNHDEB111 Installation Guide - Page 1
Netgear WNHDEB111 - HD/Gaming 5 GHz Wireless-N Networking Manual
 |
UPC - 606449054217
View all Netgear WNHDEB111 manuals
Add to My Manuals
Save this manual to your list of manuals |
Page 1 highlights
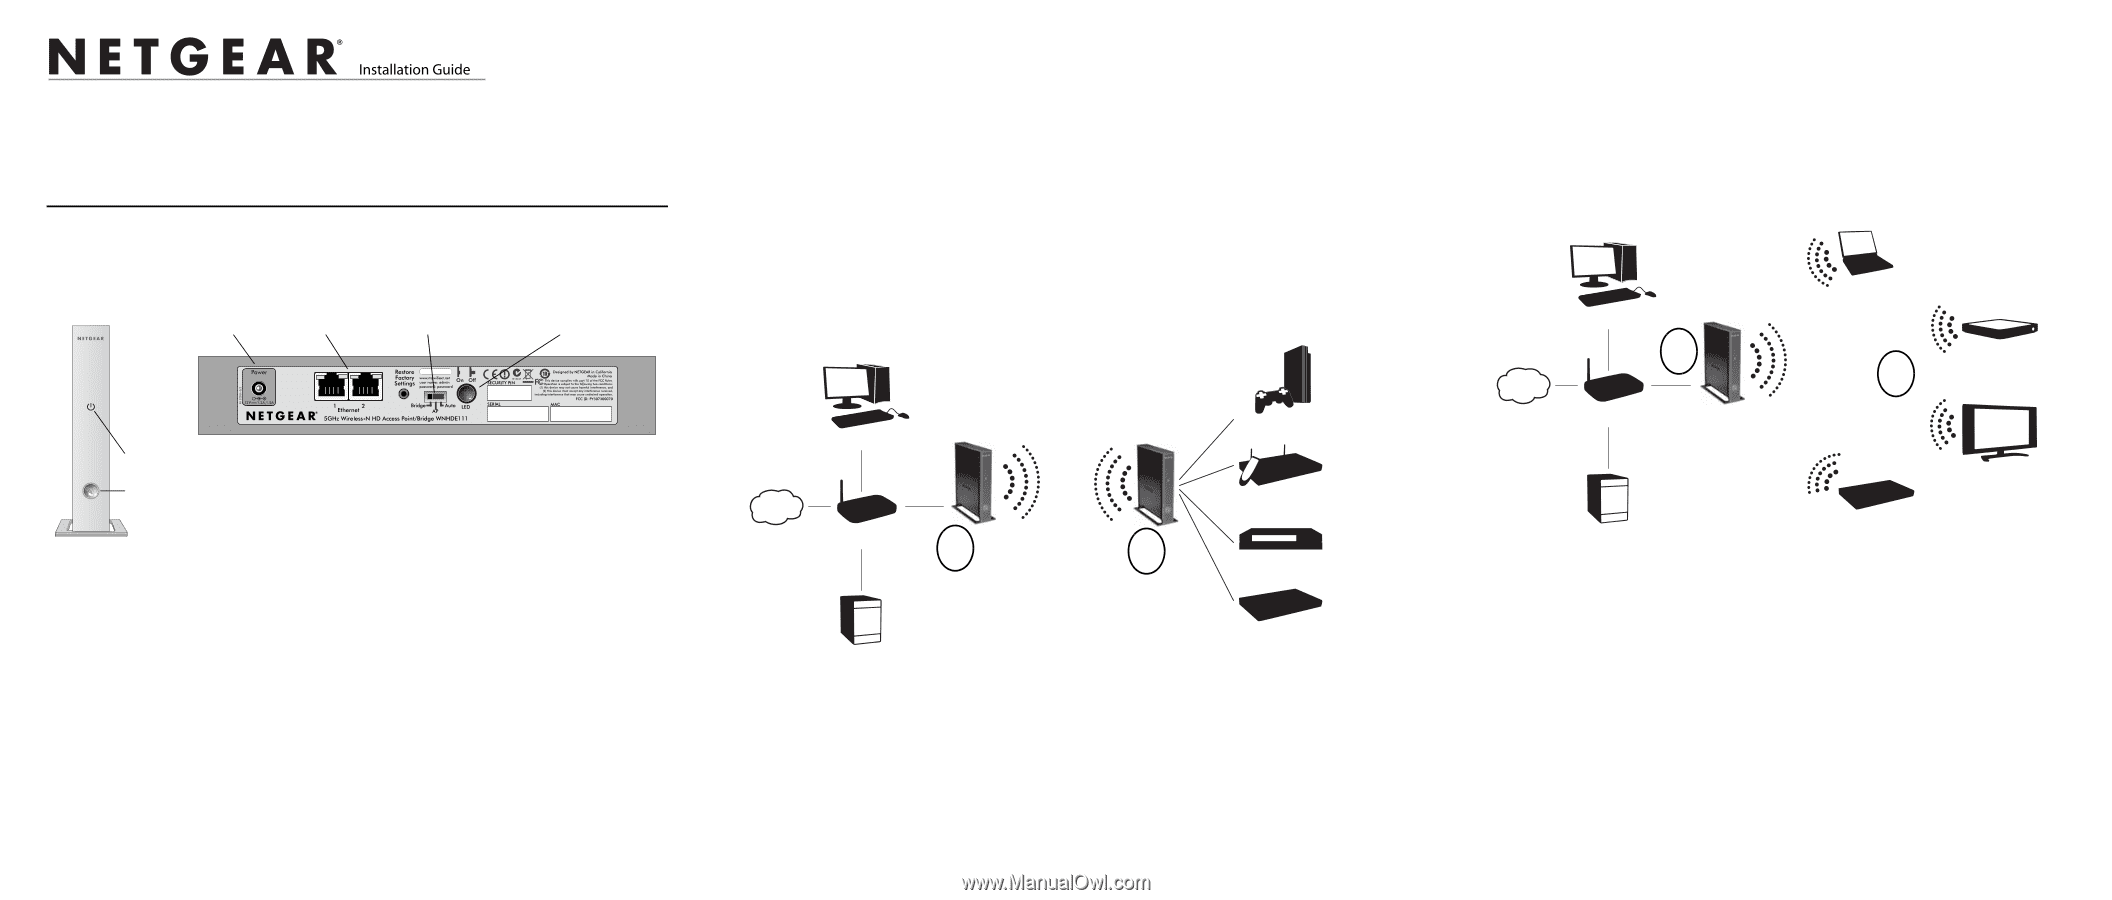
)NSTALLATION'UIDE TWNHDE111 5 GHz Wireless-N HD Access Point/Bridge & WNHDEB111 HD/Gaming 5 GHz Wireless-N Networking Kit Start Here This guide describes installation for the WNHDE111 5 GHz Wireless-N HD Access Point/ Bridge or the WNHDEB111 HD/Gaming 5 GHz Wireless-N Networking Kit. 1. Familiarize yourself with the features of the Wireless-N Bridge. Power Ethernet ports Mode switch Power light on/off switch DEFAULT ACCESS Power light WPS button/light Rear panel Front panel The mode switch can be set to: • Auto. In Auto mode, the Wireless-N Bridge will automatically sense and set its own mode. It will run in AP mode if connected to a router or gateway. Otherwise, if connected to any other wired device(s), it will run in Bridge mode. (The Wireless-N Bridge is set to Auto mode from the factory.) • AP. In AP (access point) mode, the Wireless-N Bridge will act as an access point. In this mode, the Wireless-N Bridge should be connected to a router. • Bridge. In Bridge mode, the Wireless-N Bridge is connected to your other wired device(s) and will connect wirelessly to the Wireless-N Bridge being used as an access point. 2. Verify that: • You have Broadband Internet access through a powered-on router or gateway. • You are connecting Ethernet-enabled devices, such as a network-enabled game console (an XBox 360 or Sony PS3), a digital media player (an Apple TV or NETGEAR Digital Entertainer), an IPTV set-top box, or a laptop with an embedded Wireless-N adapter. Setting Up the WNHDEB111 HD/Gaming 5 GHz Wireless-N Networking Kit For Gaming or Digital Media 1. Set the switch on the back of each Wireless-N Bridge to Auto mode. Caution: Do not plug in the power adapter before step 2. 2. Connect the Ethernet cable from a LAN port in the router or gateway (A) to either LAN port on one Wireless-N Bridge. 3. Place the other Wireless-N Bridge near the media player, game console, or set-top box (B), and connect it with an Ethernet cable. Desktop PC Gaming console Internet Router/gateway A WNHDE111 B DMA Network TV viewer/DVR Network storage Digital set-top box 4. To complete installation, connect a power adapter to the Wireless-N Bridge(s). Allow a few minutes for your devices to connect to the Internet. If you are not connected, see "Troubleshooting" on page 2. Note: By following the steps in this installation with both Wireless-N Bridge units set to Auto mode, the Wireless-N Bridge connected to your router has set itself to AP mode, while the second Wireless-N Bridge is set to Bridge mode. Setting Up One WNHDE111 5 GHz Wireless-N HD Access Point/ Bridge 1. Set the switch on the back of the Wireless-N Bridge to Auto mode (it will set itself to AP mode). 2. Connect the Ethernet cable from a LAN port on the router or gateway (A) to either LAN port on the Wireless-N Bridge. 3. Place your computer or other device (B) within range of the Wireless-N Bridge in AP mode. Laptop with embedded Wireless-N adapter Desktop PC A Internet Router/gateway WNHDE111 B Apple TV Network storage HDTV with Wireless-N Wireless-N enabled set-top box 4. Connect a power adapter to the Wireless-N Bridge. 5. Connect your wireless clients by one of the following methods: • In your client's adapter configuration settings, to use the default WPA-PSK/ WPA2-PSK security settings, enter the SSID as NETGEAR-HD, and the passphrase that is printed on the Resource CD. • If your wireless device has a WPS push-button, connect it to the Wireless-N Bridge in AP mode, similar to steps 3-5 in "To Add Another Wireless-N Bridge to a System with a Wireless-N Bridge in AP Mode" on page 1. To Add Another Wireless-N Bridge to a System with a Wireless-N Bridge in AP Mode 1. Make sure the WNHDE111 5 GHz Wireless-N HD Access Point/Bridge you are adding is not set to AP mode, place it near the devices that will work with it.
-
 1
1 -
 2
2
 |
 |