Nikon COOLPIX S3500 User Manual - Page 36
Step 4-Frame the Picture, Step 3-Adjust Camera Settings Optional, Setting, Default, Description
 |
View all Nikon COOLPIX S3500 manuals
Add to My Manuals
Save this manual to your list of manuals |
Page 36 highlights
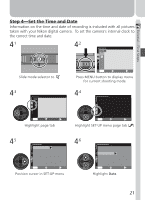
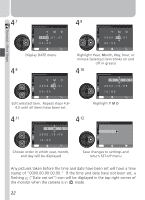
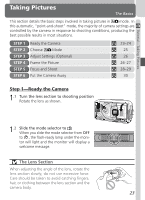
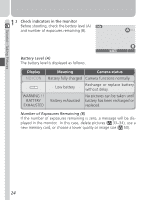
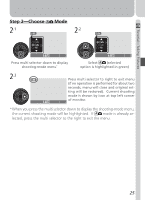
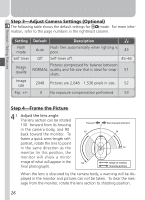
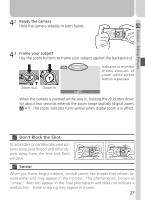
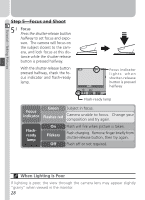
Tutorial-Taking Pictures Step 3-Adjust Camera Settings (Optional) The following table shows the default settings for mode. For more information, refer to the page numbers in the rightmost column. Setting Default Description Flash mode Auto Flash fires automatically when lighting is poor. 43 Self timer Off Self-timer off. 45-46 Image quality Pictures compressed for balance between NORMAL quality and file size that is ideal for snap- shots. 51 Image size 2048 Pictures are 2,048 × 1,536 pixels in size. 52 Exp. +/- ±0 No exposure compensation performed. 53 Step 4-Frame the Picture 4.1 Adjust the lens angle The lens section can be rotated 130° forward from its housing in the camera body, and 90° back toward the monitor. To frame a quick arms-length selfportrait, rotate the lens to point in the same direction as the monitor (in this position, the monitor will show a mirror image of what will appear in the final photograph). Forward 50° Back (toward monitor) 0° 50° 90° 130° Range of rotation Shooting position When the lens is obscured by the camera body, a warning will be displayed in the monitor and pictures can not be taken. To clear the message from the monitor, rotate the lens section to shooting position. 26
-
 1
1 -
2
-
3
-
4
-
5
-
6
-
7
-
8
-
9
-
10
-
11
-
12
-
13
-
14
-
15
-
16
-
17
-
18
-
19
-
20
-
21
-
22
-
23
-
24
-
25
-
26
-
27
-
28
-
29
-
30
-
 31
31 -
 32
32 -
 33
33 -
 34
34 -
 35
35 -
 36
36 -
 37
37 -
 38
38 -
 39
39 -
 40
40 -
 41
41 -
42
-
43
-
44
-
45
-
46
-
47
-
48
-
49
-
50
-
51
-
52
-
53
-
54
-
55
-
56
-
57
-
58
-
59
-
60
-
61
-
62
-
63
-
64
-
65
-
66
-
67
-
68
-
69
-
70
-
71
-
72
-
73
-
74
-
75
-
76
-
77
-
78
-
79
-
80
-
81
-
82
-
83
-
84
-
85
-
86
-
87
-
88
-
89
-
90
-
91
-
92
-
93
-
94
-
95
-
96
-
97
-
98
-
99
-
100
-
101
-
102
-
103
-
104
-
105
-
106
-
107
-
108
-
109
-
110
-
111
 |
 |
