Nikon Coolpix S3 User Manual - Page 24
Basic Photography, Step 1 — Select Auto Mode
 |
UPC - 018208255382
View all Nikon Coolpix S3 manuals
Add to My Manuals
Save this manual to your list of manuals |
Page 24 highlights
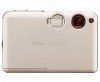
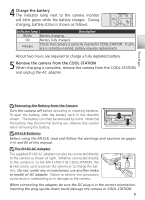
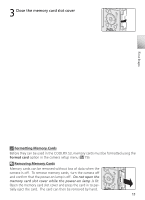
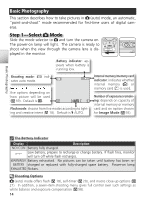
Basic Photography This section describes how to take pictures in (auto) mode, an automatic, "point-and-shoot" mode recommended for first-time users of digital cameras. Step 1-Select Mode Slide the mode selector to and turn the camera on. The power-on lamp will light. The camera is ready to shoot when the view through the camera lens is displayed in the monitor. Battery indicator: appears when battery is running low. Shooting mode: indi- cates auto mode. five options depending on how picture will be used ( 59). Default is . AUTO 9 Flash mode: choose from five modes according to lighting and creative intent ( 18). Default is AUTO. Internal memory/memory card indicator: indicates whether internal memory ( ) or memory card ( ) is used. Number of exposures remaining: depends on capacity of internal memory or memory card and on option chosen for Image Mode ( 93). Basic Photography The Battery Indicator Display Description NO ICON Battery fully charged. Low battery; prepare to recharge or change battery. If flash fires, monitor will turn off while flash recharges. WARNING!! Battery exhausted. No pictures can be taken until battery has been re- BATTERY charged or replaced with fully-charged spare battery. Power-on lamp EXHAUSTED flickers. Shooting Options (auto) mode offers flash ( 18), self-timer ( 20), and macro close-up options ( 21). In addition, a seven-item shooting menu gives full control over such settings as white balance and exposure compensation ( 58). 14
-
 1
1 -
2
-
3
-
4
-
5
-
6
-
7
-
8
-
9
-
10
-
11
-
12
-
13
-
14
-
15
-
16
-
17
-
18
-
 19
19 -
 20
20 -
 21
21 -
 22
22 -
 23
23 -
 24
24 -
 25
25 -
 26
26 -
 27
27 -
 28
28 -
 29
29 -
30
-
31
-
32
-
33
-
34
-
35
-
36
-
37
-
38
-
39
-
40
-
41
-
42
-
43
-
44
-
45
-
46
-
47
-
48
-
49
-
50
-
51
-
52
-
53
-
54
-
55
-
56
-
57
-
58
-
59
-
60
-
61
-
62
-
63
-
64
-
65
-
66
-
67
-
68
-
69
-
70
-
71
-
72
-
73
-
74
-
75
-
76
-
77
-
78
-
79
-
80
-
81
-
82
-
83
-
84
-
85
-
86
-
87
-
88
-
89
-
90
-
91
-
92
-
93
-
94
-
95
-
96
-
97
-
98
-
99
-
100
-
101
-
102
-
103
-
104
-
105
-
106
-
107
-
108
-
109
-
110
 |
 |