Nikon D-40 User Manual - Page 83
White balance, White balance preset, Measure, Measuring a Value for Preset White Balance
 |
UPC - 915436789620
View all Nikon D-40 manuals
Add to My Manuals
Save this manual to your list of manuals |
Page 83 highlights
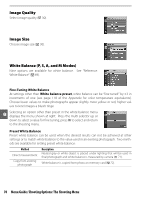
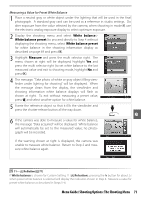
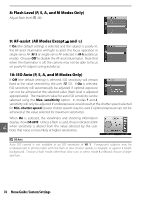
Measuring a Value for Preset White Balance 1 Place a neutral gray or white object under the lighting that will be used in the final photograph. A standard gray card can be used as a reference in studio settings. Do alter exposure from the value selected by the camera; when shooting in mode M, use the electronic analog exposure display to select optimum exposure. 2 Display the shooting menu and select White balance> White balance preset (to proceed directly to Step 4 without displaying the shooting menu, select White balance preset for white balance in the shooting information display as described on page 49 and press OK). 3 Highlight Measure and press the multi selector right. The menu shown at right will be displayed; highlight Yes and press the multi selector right (to set white balance to the last measured value and exit to shooting mode, highlight No and press OK). 4 The message, "Take photo of white or gray object filling viewfinder under lighting for shooting" will be displayed. When the message clears from the display, the viewfinder and shooting information white balance displays will flash as shown at right. To exit without measuring a preset value, press and select another option for white balance. 5 Frame the reference object so that it fills the viewfinder and press the shutter-release button all the way down. 6 If the camera was able to measure a value for white balance, the message "Data acquired" will be displayed. White balance will automatically be set to the measured value; no photograph will be recorded. If the warning shown at right is displayed, the camera was unable to measure white balance. Return to Step 2 and measure white balance again. 11- /Fn Button ( 77) If White balance is chosen for Custom Setting 11 ( /Fn button), pressing the Fn button for about 2s when preset white balance is selected will display the indicators shown in Step 4. Measure a value for preset white balance as described in Steps 5-6. Menu Guide/Shooting Options: The Shooting Menu 71
-
 1
1 -
2
-
3
-
4
-
5
-
6
-
7
-
8
-
9
-
10
-
11
-
12
-
13
-
14
-
15
-
16
-
17
-
18
-
19
-
20
-
21
-
22
-
23
-
24
-
25
-
26
-
27
-
28
-
29
-
30
-
31
-
32
-
33
-
34
-
35
-
36
-
37
-
38
-
39
-
40
-
41
-
42
-
43
-
44
-
45
-
46
-
47
-
48
-
49
-
50
-
51
-
52
-
53
-
54
-
55
-
56
-
57
-
58
-
59
-
60
-
61
-
62
-
63
-
64
-
65
-
66
-
67
-
68
-
69
-
70
-
71
-
72
-
73
-
74
-
75
-
76
-
77
-
 78
78 -
 79
79 -
 80
80 -
 81
81 -
 82
82 -
 83
83 -
 84
84 -
 85
85 -
 86
86 -
 87
87 -
 88
88 -
89
-
90
-
91
-
92
-
93
-
94
-
95
-
96
-
97
-
98
-
99
-
100
-
101
-
102
-
103
-
104
-
105
-
106
-
107
-
108
-
109
-
110
-
111
-
112
-
113
-
114
-
115
-
116
-
117
-
118
-
119
-
120
-
121
-
122
-
123
-
124
-
125
-
126
-
127
-
128
-
129
-
130
-
131
-
132
-
133
-
134
-
135
-
136
-
137
-
138
-
139
 |
 |
