Nikon D3000 Quick Start Guide - Page 2
Installing Software, Copying Photos to a Computer, Printing Via Direct USB Connection - video
 |
UPC - 018208254620
View all Nikon D3000 manuals
Add to My Manuals
Save this manual to your list of manuals |
Page 2 highlights
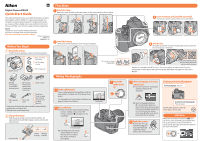
Installing Software The Software Suite CD The supplied Software Suite CD contains Nikon Transfer, ViewNX, and related software. Nikon Transfer is used to copy (transfer) pictures from the camera to the computer and to perform such other transfer-related functions as making backups and embedding information in pictures as they are transferred. ViewNX is used to view pictures after transfer; among the other tasks it can perform are grouping pictures, converting images to different file formats, editing NEF/RAW photographs, and adjusting NEF/RAW and JPEG images. For more information, see online help. System Requirements Windows Macintosh Intel Celeron, Pentium 4, or Intel Core CPU series with clock speed equivalent to 1 GHz or better Power PC G4, Power PC G5, Intel Core series, or Intel Xeon (with Universal Binary) OS Preinstalled versions of Windows Vista (32bit) (Service Pack 1) or Windows XP Home Edition/Professional (Service Pack 3) Preinstalled versions of Mac OS X version 10.3.9, 10.4.11, or 10.5.6 • Windows Vista: 1 GB or more RAM • Windows XP: 512 MB or more (1 GB or more recommended) 512 MB or more (1 GB or more recommended) Hard-disk A minimum of 1 GB free hard disk space required when Software Suite applications are space running Video resolution 1,024 × 768 (XGA) or greater with 24-bit color (True Color/millions of colors) or more Installation Windows 1 Start the computer and insert the installer CD. Insert the Software Suite CD in a CD-ROM drive. Windows Vista An AutoPlay dialog will be displayed; click Run Welcome.exe. A "User Account Control" dialog will then be displayed; click Continue. A language-selection dialog will be displayed. If Nikon Transfer or ViewNX Is Already Installed The language-selection dialog is not displayed if Nikon Transfer or ViewNX is already installed. The Software Suite installer dialog is displayed in the language selected when Nikon Transfer or ViewNX was first installed. If the Installer Does Not Start Automatically If the installer does not start automatically, select Computer or My Computer from the Start menu, then double-click the Software Suite CD icon. 2 Select a language. Select a language and click Next. If the desired language is not available, click Region Selection to choose a different region and then choose the desired language (the Region Selection button is not available in the European release of the Software Suite). The Software Suite installer dialog will be displayed. q Standard Install: Install Nikon Transfer, ViewNX, and related software. w Custom Install: Install selected software. q e Link to Nikon: Download trial versions w e of Nikon software or visit Nikon r technical support websites (Internet connection required). t r my Picturetown (Photo Storage and Sharing Service): Connect to Nikon's convenient and easy-to-use photo management site, my Picturetown. (Internet connection required. Not available in some areas.) t Install Guide: View online help for installing and using the Software Suite. 3 Start the installer. Click Standard Install and follow the on-screen instructions to install Apple QuickTime, Nikon Transfer, and ViewNX. Apple QuickTime Some time may be required to complete installation on some systems. 4 Check for recommended downloads. Nikon provides additional software for download via the Internet. Select the software you want to download and click Confirm (an Internet connection is required). To proceed without downloading additional software, click Skip. Available Software NEF Codec 1 Capture NX Free Trial 3 WT-4 Setup Utility Thumbnail Selector Windows Vista Available 2 Available Windows XP Available 2 Available Not supported by D3000. 1 The NEF Codec is a Nikon RAW Codec that allows NEF (RAW) images to be handled with the same ease as JPEG or TIFF images. 2 Automatically selected. Installation recommended. 3 A trial version of Nikon's photofinishing software. Supported software can also be installed using the Custom Install option. The time required for download varies with network conditions. 5 Exit the installer. The message shown at right will be displayed when installation is complete. Click Yes to close the Software Suite installer dialog. Microsoft DirectX 9 (Windows XP only) If the Microsoft DirectX 9 installer starts, follow the on-screen instructions to complete installation. 6 Remove the installer CD from the CD-ROM drive. Macintosh 1 Start the computer and insert the installer CD. Insert the Software Suite CD in a CD-ROM drive. 2 Double-click the Welcome icon. Double-click the Software Suite installer CD icon on the desktop and then double-click the Welcome icon. Enter an administrator name and password when prompted and click OK. A language-selection dialog will be displayed. If Nikon Transfer or ViewNX Is Already Installed The language-selection dialog is not displayed if Nikon Transfer or ViewNX is already installed. The Software Suite installer dialog is displayed in the language selected when Nikon Transfer or ViewNX was first installed. 3 Select a language. Select a language and click Next. If the desired language is not available, click Region Selection to choose a different region and then choose the desired language (the Region Selection button is not available in the European release of the Software Suite). The Software Suite installer dialog will be displayed. q Standard Install: Install Nikon Transfer, ViewNX, and related software. w Custom Install: Install selected software. q e Link to Nikon: Download trial versions w e of Nikon software or visit Nikon r technical support websites (Internet connection required). t r my Picturetown (Photo Storage and Sharing Service): Connect to Nikon's convenient and easy-to-use photo management site, my Picturetown. (Internet connection required. Not available in some areas.) t Install Guide: View online help for installing and using the Software Suite. 4 Start the installer. Click Standard Install and follow the on-screen instructions to install Nikon Transfer and ViewNX. Auto-launch When prompted, click Yes to have Nikon Transfer start automatically whenever a camera is connected or a camera memory card is inserted in a card reader or card slot. This setting can be changed after installation in the transfer options "Preferences" panel. 5 Check for recommended downloads. Nikon provides additional software for download via the Internet. Select the software you want to download and click Confirm (an Internet connection is required). To proceed without downloading additional software, click Skip. Available Software Software not supported under your computer's operating system is not available for download and will not be displayed in the "View Suggested Online Install" dialog. Mac OS X version 10.5.6 Mac OS X version 10.4.11 Mac OS X version 10.3.9 Capture NX Free Trial * Available Available Not available WT-4 Setup Utility Thumbnail Selector Not supported by D3000. * A trial version of Nikon's photofinishing software. Supported software can also be installed using the Custom Install option. The time required for download varies with network conditions. 6 Exit the installer. The message shown at right will be displayed when installation is complete. Click OK to close the Software Suite installer dialog. 7 Remove the installer CD from the CD-ROM drive. Copying Photos to a Computer The illustrations in Steps 4 and 5 are from Windows Vista. Use a Reliable Power Source Nikon recommends using a fully-charged EN-EL9a battery or an optional EH-5a AC adapter with an EP-5 power connector to prevent the camera from turning off unexpectedly. Do not use another make or model of AC adapter. 1 Turn the camera off. Turn the camera off and insert the memory card containing the pictures to be transferred to the computer. 2 Connect the USB cable. Connect the supplied UC-E4 USB cable as shown. Do not use force or attempt to insert the connectors at an angle. USB Hubs Connect the camera directly to the computer. The computer may fail to detect the camera if it is connected via a USB hub or keyboard. 3 Turn the camera on. When the computer detects the camera: • Windows Vista: An AutoPlay dialog will be displayed. Click Copy pictures to a folder on my computer using Nikon Transfer to start Nikon Transfer. To skip the AutoPlay dialog in future, select Always do this for this device before clicking the Nikon Transfer option. • Windows XP: An AutoPlay dialog will be displayed. Select Nikon Transfer as the program that will be used to copy pictures to a folder on your computer and click OK to start Nikon Transfer. To skip the AutoPlay dialog in future, select Always use this program for this action before clicking OK. • Macintosh: Nikon Transfer will start automatically if the auto-launch option was selected when Nikon Transfer was installed. 4 Confirm that the camera is selected in the "Source" panel. Confirm that the camera appears as a device button in the "Source" panel of the Nikon Transfer "Options" area. If the camera is not listed, check that it is on and connected to the computer. Device button 5 Click Start Transfer. At default settings, Nikon Transfer will copy all photographs to the computer and ViewNX will then start automatically. Use ViewNX to view photographs after transfer. ViewNX can also be started by double-clicking the ViewNX shortcut on the desktop (Windows) or by clicking the ViewNX icon in the Dock (Macintosh). Online Help To view online help, start Nikon Transfer or ViewNX and select the appropriate option from the Help menu. 6 Disconnect the camera. Turn the camera off and disconnect the USB cable. Printing Via Direct USB Connection JPEG photographs can be printed directly from a camera connected to a PictBridge printer (RAW/NEF photographs can not be printed by direct USB connection). See page 107 of the User's Manual for details. 1 Turn the camera off. Turn the camera off and insert the memory card containing the pictures to be printed. 2 Turn the printer on. 3 Connect the USB cable. Connect the supplied UC-E4 USB cable as shown. Do not use force or attempt to insert the connectors at an angle. 4 Turn the camera on. A welcome screen will be displayed (q), followed by the PictBridge playback display (w). q w 5 Select a photograph. Press the multi selector left or right to view additional photographs, or press X to zoom in on the current picture. To view six pictures at a time, press W and then use the multi selector to highlight photographs or press X to view the highlighted photo full frame. 6 Display printing options. To print the photograph currently selected in the PictBridge playback display, press J. The menu shown at right will be displayed; press the multi selector up or down to highlight an option and press the multi selector right to select. Page size No. of copies Border Time stamp Cropping Press the multi selector up or down to highlight an option or select the number of copies and press J to select and return to the PictBridge menu. 7 Select Start printing. To start printing, highlight Start printing and press J. The camera will return to the PictBridge playback display when printing is complete. To cancel and return to the PictBridge display before printing is complete, press J. 8 Disconnect the camera. Turn the camera off and disconnect the USB cable. © 2009 Nikon Corporation
-
 1
1 -
 2
2
 |
 |
