Nikon D3200 User Manual - Page 175
Quick Retouch, Straighten, Distortion Control, Manual
 |
View all Nikon D3200 manuals
Add to My Manuals
Save this manual to your list of manuals |
Page 175 highlights
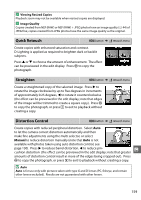
A Viewing Resized Copies Playback zoom may not be available when resized copies are displayed. A Image Quality Copies created from NEF (RAW) or NEF (RAW) + JPEG photos have an image quality (0 44) of JPEG fine; copies created from JPEG photos have the same image quality as the original. Quick Retouch G button ➜ N retouch menu Create copies with enhanced saturation and contrast. D-Lighting is applied as required to brighten dark or backlit subjects. Press 1 or 3 to choose the amount of enhancement. The effect can be previewed in the edit display. Press J to copy the photograph. Straighten G button ➜ N retouch menu Create a straightened copy of the selected image. Press 2 to rotate the image clockwise by up to five degrees in increments of approximately 0.25 degrees, 4 to rotate it counterclockwise (the effect can be previewed in the edit display; note that edges of the image will be trimmed to create a square copy). Press J to copy the photograph, or press K to exit to playback without creating a copy. Distortion Control G button ➜ N retouch menu Create copies with reduced peripheral distortion. Select Auto to let the camera correct distortion automatically and then make fine adjustments using the multi selector, or select Manual to reduce distortion manually (note that Auto is not available with photos taken using auto distortion control; see page 130). Press 2 to reduce barrel distortion, 4 to reduce pin- u cushion distortion (the effect can be previewed in the edit display; note that greater amounts of distortion control result in more of the edges being cropped out). Press J to copy the photograph, or press K to exit to playback without creating a copy. D Auto Auto is for use only with pictures taken with type G and D lenses (PC, fisheye, and certain other lenses excluded). Results are not guaranteed with other lenses. 159
-
 1
1 -
2
-
3
-
4
-
5
-
6
-
7
-
8
-
9
-
10
-
11
-
12
-
13
-
14
-
15
-
16
-
17
-
18
-
19
-
20
-
21
-
22
-
23
-
24
-
25
-
26
-
27
-
28
-
29
-
30
-
31
-
32
-
33
-
34
-
35
-
36
-
37
-
38
-
39
-
40
-
41
-
42
-
43
-
44
-
45
-
46
-
47
-
48
-
49
-
50
-
51
-
52
-
53
-
54
-
55
-
56
-
57
-
58
-
59
-
60
-
61
-
62
-
63
-
64
-
65
-
66
-
67
-
68
-
69
-
70
-
71
-
72
-
73
-
74
-
75
-
76
-
77
-
78
-
79
-
80
-
81
-
82
-
83
-
84
-
85
-
86
-
87
-
88
-
89
-
90
-
91
-
92
-
93
-
94
-
95
-
96
-
97
-
98
-
99
-
100
-
101
-
102
-
103
-
104
-
105
-
106
-
107
-
108
-
109
-
110
-
111
-
112
-
113
-
114
-
115
-
116
-
117
-
118
-
119
-
120
-
121
-
122
-
123
-
124
-
125
-
126
-
127
-
128
-
129
-
130
-
131
-
132
-
133
-
134
-
135
-
136
-
137
-
138
-
139
-
140
-
141
-
142
-
143
-
144
-
145
-
146
-
147
-
148
-
149
-
150
-
151
-
152
-
153
-
154
-
155
-
156
-
157
-
158
-
159
-
160
-
161
-
162
-
163
-
164
-
165
-
166
-
167
-
168
-
169
-
 170
170 -
 171
171 -
 172
172 -
 173
173 -
 174
174 -
 175
175 -
 176
176 -
 177
177 -
 178
178 -
 179
179 -
 180
180 -
181
-
182
-
183
-
184
-
185
-
186
-
187
-
188
-
189
-
190
-
191
-
192
-
193
-
194
-
195
-
196
-
197
-
198
-
199
-
200
-
201
-
202
-
203
-
204
-
205
-
206
-
207
-
208
-
209
-
210
-
211
-
212
-
213
-
214
-
215
-
216
-
217
-
218
-
219
-
220
-
221
-
222
-
223
-
224
-
225
-
226
-
227
-
228
 |
 |
