Nikon D5100 Reference Manual - Page 117
Live View, Framing Photographs in the Monitor
 |
UPC - 018208254781
View all Nikon D5100 manuals
Add to My Manuals
Save this manual to your list of manuals |
Page 117 highlights
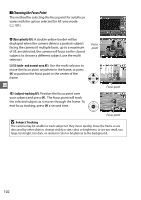
xLive View Framing Photographs in the Monitor Follow the steps below to take photographs in live view. 1 Rotate the live view switch. The mirror will be raised and the view through the lens will be displayed in the camera monitor. The subject will no longer be visible in the viewfinder. Live view switch 2 Position the focus point. Position the focus point over your subject as x described on page 102. Focus point 3 Focus. Press the shutter-release button halfway. The focus point will blink green while the camera focuses. If the camera is able to focus, the focus point will be displayed in green; if the camera is unable to focus, the focus point will blink red (note that pictures can be taken even when the focus point blinks red; check focus in the monitor before shooting). Except in i and j modes, exposure can be locked by pressing the AE-L/AF-L button. 4 Take the picture. Press the shutter-release button the rest of the way down. The monitor turns off and the memory card access lamp lights during recording. Do not remove the battery or memory card or unplug the optional AC adapter until recording is complete. When shooting is Memory card access lamp complete, the photograph will be displayed in the monitor for a few seconds or until the shutter-release button is pressed halfway. The camera will then return to live view mode. To exit, rotate the live view switch. 99
-
 1
1 -
2
-
3
-
4
-
5
-
6
-
7
-
8
-
9
-
10
-
11
-
12
-
13
-
14
-
15
-
16
-
17
-
18
-
19
-
20
-
21
-
22
-
23
-
24
-
25
-
26
-
27
-
28
-
29
-
30
-
31
-
32
-
33
-
34
-
35
-
36
-
37
-
38
-
39
-
40
-
41
-
42
-
43
-
44
-
45
-
46
-
47
-
48
-
49
-
50
-
51
-
52
-
53
-
54
-
55
-
56
-
57
-
58
-
59
-
60
-
61
-
62
-
63
-
64
-
65
-
66
-
67
-
68
-
69
-
70
-
71
-
72
-
73
-
74
-
75
-
76
-
77
-
78
-
79
-
80
-
81
-
82
-
83
-
84
-
85
-
86
-
87
-
88
-
89
-
90
-
91
-
92
-
93
-
94
-
95
-
96
-
97
-
98
-
99
-
100
-
101
-
102
-
103
-
104
-
105
-
106
-
107
-
108
-
109
-
110
-
111
-
 112
112 -
 113
113 -
 114
114 -
 115
115 -
 116
116 -
 117
117 -
 118
118 -
 119
119 -
 120
120 -
 121
121 -
 122
122 -
123
-
124
-
125
-
126
-
127
-
128
-
129
-
130
-
131
-
132
-
133
-
134
-
135
-
136
-
137
-
138
-
139
-
140
-
141
-
142
-
143
-
144
-
145
-
146
-
147
-
148
-
149
-
150
-
151
-
152
-
153
-
154
-
155
-
156
-
157
-
158
-
159
-
160
-
161
-
162
-
163
-
164
-
165
-
166
-
167
-
168
-
169
-
170
-
171
-
172
-
173
-
174
-
175
-
176
-
177
-
178
-
179
-
180
-
181
-
182
-
183
-
184
-
185
-
186
-
187
-
188
-
189
-
190
-
191
-
192
-
193
-
194
-
195
-
196
-
197
-
198
-
199
-
200
-
201
-
202
-
203
-
204
-
205
-
206
-
207
-
208
-
209
-
210
-
211
-
212
-
213
-
214
-
215
-
216
-
217
-
218
-
219
-
220
-
221
-
222
-
223
-
224
-
225
-
226
-
227
-
228
-
229
-
230
-
231
-
232
-
233
-
234
-
235
-
236
-
237
-
238
-
239
-
240
-
241
-
242
-
243
-
244
-
245
-
246
-
247
-
248
-
249
-
250
-
251
-
252
-
253
-
254
-
255
-
256
-
257
-
258
-
259
-
260
 |
 |
