Nikon F5 Instruction Manual - Page 17
Mounting Lens - body
 |
UPC - 018208017959
View all Nikon F5 manuals
Add to My Manuals
Save this manual to your list of manuals |
Page 17 highlights
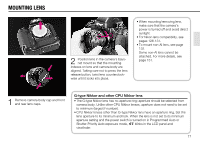
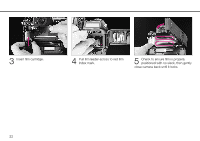
MOUNTING LENS 2 Position lens in the camera's bayonet mount so that the mounting indexes on lens and camera body are aligned. Taking care not to press the lens release button, twist lens counterclockwise until it locks into place. • When mounting/removing lens, make sure that the camera's power is turned off and avoid direct sunlight. • For Nikon lens compatibility, see pages 128-131. • To mount non-AI lens, see page 132. Some non-AI lens cannot be attached. For more details, see page 131. 1 Remove camera body cap and front and rear lens caps. G-type Nikkor and other CPU Nikkor lens • The G-type Nikkor lens has no aperture ring; aperture should be selected from camera body. Unlike other CPU Nikkor lenses, aperture does not need to be set to minimum (largest f-number). • CPU Nikkor lenses other than G-type Nikkor lens have an aperture ring. Set the lens aperture to its minimum and lock. When the lens is not set to its minimum aperture setting and the power switch is turned on in Programmed Auto or Shutter-Priority Auto exposure mode, ƒEE blinks in the LCD panel and viewfinder. 17
-
 1
1 -
2
-
3
-
4
-
5
-
6
-
7
-
8
-
9
-
10
-
11
-
 12
12 -
 13
13 -
 14
14 -
 15
15 -
 16
16 -
 17
17 -
 18
18 -
 19
19 -
 20
20 -
 21
21 -
 22
22 -
23
-
24
-
25
-
26
-
27
-
28
-
29
-
30
-
31
-
32
-
33
-
34
-
35
-
36
-
37
-
38
-
39
-
40
-
41
-
42
-
43
-
44
-
45
-
46
-
47
-
48
-
49
-
50
-
51
-
52
-
53
-
54
-
55
-
56
-
57
-
58
-
59
-
60
-
61
-
62
-
63
-
64
-
65
-
66
-
67
-
68
-
69
-
70
-
71
-
72
-
73
-
74
-
75
-
76
-
77
-
78
-
79
-
80
-
81
-
82
-
83
-
84
-
85
-
86
-
87
-
88
-
89
-
90
-
91
-
92
-
93
-
94
-
95
-
96
-
97
-
98
-
99
-
100
-
101
-
102
-
103
-
104
-
105
-
106
-
107
-
108
-
109
-
110
-
111
-
112
-
113
-
114
-
115
-
116
-
117
-
118
-
119
-
120
-
121
-
122
-
123
-
124
-
125
-
126
-
127
-
128
-
129
-
130
-
131
-
132
-
133
-
134
-
135
-
136
-
137
-
138
-
139
-
140
-
141
-
142
-
143
-
144
-
145
-
146
-
147
-
148
-
149
-
150
-
151
-
152
-
153
-
154
-
155
-
156
-
157
-
158
-
159
-
160
-
161
-
162
-
163
-
164
-
165
-
166
-
167
-
168
-
169
-
170
 |
 |