Nikon F5 Instruction Manual - Page 54
Shutter-Priority Auto exposure mode, Aperture-Priority Auto exposure mode, Manual exposure mode - specifications
 |
UPC - 018208017959
View all Nikon F5 manuals
Add to My Manuals
Save this manual to your list of manuals |
Page 54 highlights
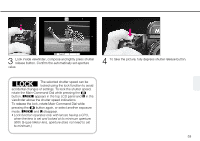
Shutter-Priority Auto exposure mode (™) Allows you to manually set your desired shutter speed. To freeze the action, use a high shutter speed; to create motion effects, choose a slower shutter speed. The F5's microcomputer automatically selects the proper aperture to match the manually set shutter speed to ensure a correct exposure. See pages 58-59 for Shutter-Priority Auto operation. Note that Shutter-Priority Auto exposure mode operates only with Nikon lenses having a built-in CPU (AF Nikkor and AI-P Nikkor lenses). Aperture-Priority Auto exposure mode (£) By varying the aperture, you can control the depth of field. Smaller apertures make the background and foreground sharper (recommended for landscape pictures) while larger apertures tend to blur the background (recommended for portraits). Your selected aperture will determine the shutter speed that is automatically set by the camera's microcomputer. When using smaller apertures with correspondingly slower shutter speeds, remember that, generally, any speed below 1/(focal length in use) second, requires the use of a tripod to prevent picture blur due to camera shake. The higher the corresponding shutter speed to the aperture you set, the easier it is to stop action. Adjust the selected aperture if the speed is not appropriate for conditions or the specific effect you want. For Aperture-Priority Auto operation, see pages 61-63. Manual exposure mode (¢) Manual exposure control allows you to make both aperture and shutter speed settings. For a technically correct exposure, follow the recommendation of the camera's light meter, as indicated by the LCD readout. To achieve a specific creative effect (e.g., intentional blur, intentional under- or over-exposure), disregard the LCD and modify the recommended exposure settings. For Manual exposure operation, see pages 64-67. 54
-
 1
1 -
2
-
3
-
4
-
5
-
6
-
7
-
8
-
9
-
10
-
11
-
12
-
13
-
14
-
15
-
16
-
17
-
18
-
19
-
20
-
21
-
22
-
23
-
24
-
25
-
26
-
27
-
28
-
29
-
30
-
31
-
32
-
33
-
34
-
35
-
36
-
37
-
38
-
39
-
40
-
41
-
42
-
43
-
44
-
45
-
46
-
47
-
48
-
 49
49 -
 50
50 -
 51
51 -
 52
52 -
 53
53 -
 54
54 -
 55
55 -
 56
56 -
 57
57 -
 58
58 -
 59
59 -
60
-
61
-
62
-
63
-
64
-
65
-
66
-
67
-
68
-
69
-
70
-
71
-
72
-
73
-
74
-
75
-
76
-
77
-
78
-
79
-
80
-
81
-
82
-
83
-
84
-
85
-
86
-
87
-
88
-
89
-
90
-
91
-
92
-
93
-
94
-
95
-
96
-
97
-
98
-
99
-
100
-
101
-
102
-
103
-
104
-
105
-
106
-
107
-
108
-
109
-
110
-
111
-
112
-
113
-
114
-
115
-
116
-
117
-
118
-
119
-
120
-
121
-
122
-
123
-
124
-
125
-
126
-
127
-
128
-
129
-
130
-
131
-
132
-
133
-
134
-
135
-
136
-
137
-
138
-
139
-
140
-
141
-
142
-
143
-
144
-
145
-
146
-
147
-
148
-
149
-
150
-
151
-
152
-
153
-
154
-
155
-
156
-
157
-
158
-
159
-
160
-
161
-
162
-
163
-
164
-
165
-
166
-
167
-
168
-
169
-
170
 |
 |