Nokia 6301 Nokia 6301 User Guide in English - Page 13
Get started, Install the SIM card and battery - charger
 |
View all Nokia 6301 manuals
Add to My Manuals
Save this manual to your list of manuals |
Page 13 highlights
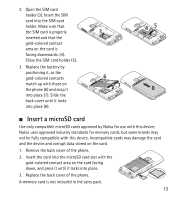
may not transfer the activation keys which need to be restored with the content for you to be able to continue the use of OMA DRM-protected content after the device memory is formatted. You may also need to restore the activation keys in case the files on your device get corrupted. If your device has WMDRM protected content, both the activation keys and the content will be lost if the device memory is formatted. You may also lose the activation keys and the content if the files on your device get corrupted. Losing the activation keys or the content may limit your ability to use the same content on your device again. For more information, contact your service provider. 1. Get started ■ Install the SIM card and battery Always switch the device off and disconnect the charger before removing the battery. This device is intended for use with a BL-4C battery. Always use original Nokia batteries. See "Nokia battery authentication guidelines," p. 83. The SIM card and its contacts can easily be damaged by scratches or bending, so be careful when handling, inserting, or removing the card. 1. With the back of the phone facing you, press firmly and slide the back cover to remove it from the phone (1). To remove the battery, lift it as shown (2). 12
-
 1
1 -
2
-
3
-
4
-
5
-
6
-
7
-
 8
8 -
 9
9 -
 10
10 -
 11
11 -
 12
12 -
 13
13 -
 14
14 -
 15
15 -
 16
16 -
 17
17 -
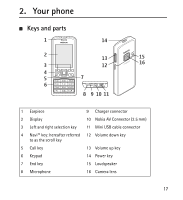 18
18 -
19
-
20
-
21
-
22
-
23
-
24
-
25
-
26
-
27
-
28
-
29
-
30
-
31
-
32
-
33
-
34
-
35
-
36
-
37
-
38
-
39
-
40
-
41
-
42
-
43
-
44
-
45
-
46
-
47
-
48
-
49
-
50
-
51
-
52
-
53
-
54
-
55
-
56
-
57
-
58
-
59
-
60
-
61
-
62
-
63
-
64
-
65
-
66
-
67
-
68
-
69
-
70
-
71
-
72
-
73
-
74
-
75
-
76
-
77
-
78
-
79
-
80
-
81
-
82
-
83
-
84
-
85
-
86
-
87
-
88
-
89
-
90
-
91
-
92
-
93
-
94
-
95
-
96
-
97
-
98
-
99
-
100
-
101
-
102
-
103
-
104
-
105
-
106
-
107
-
108
-
109
-
110
-
111
-
112
-
113
-
114
-
115
-
116
-
117
-
118
-
119
-
120
-
121
-
122
-
123
-
124
-
125
-
126
-
127
-
128
-
129
-
130
-
131
-
132
-
133
-
134
-
135
-
136
-
137
-
138
-
139
-
140
-
141
-
142
-
143
-
144
-
145
-
146
-
147
-
148
-
149
-
150
-
151
-
152
-
153
-
154
-
155
-
156
-
157
-
158
-
159
-
160
-
161
-
162
-
163
-
164
-
165
-
166
-
167
-
168
-
169
-
170
-
171
-
172
-
173
-
174
-
175
-
176
-
177
-
178
-
179
-
180
-
181
-
182
-
183
-
184
-
185
-
186
-
187
-
188
-
189
-
190
-
191
-
192
-
193
-
194
-
195
-
196
-
197
-
198
-
199
-
200
-
201
 |
 |
