Nokia BH 102 User Guide - Page 4
Get started - pairing
 |
UPC - 758478013045
View all Nokia BH 102 manuals
Add to My Manuals
Save this manual to your list of manuals |
Page 4 highlights
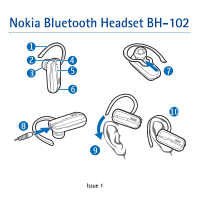
Get started The headset contains the following parts shown on the title page: earloop (1), charger connector (2), earpiece (3), blue indicator light (4), multifunction key (5), and microphone (6). Before using the headset, you must charge the battery and pair the headset with a compatible phone. Parts of the device are magnetic. Metallic materials may be attracted to the device. Do not place credit cards or other magnetic storage media near the device, because information stored on them may be erased. Chargers This device is intended for use when supplied with power from the following chargers: AC-3, AC-4, AC-5, and DC-4. Warning: Use only chargers approved by Nokia for use with this particular enhancement. The use of any other types may invalidate any approval or warranty, and may be dangerous. When you disconnect the power cord of any enhancement, grasp and pull the plug, not the cord. Charge the battery Before charging the battery, carefully read "Battery information". 1. Connect the charger to a wall outlet. 2. Connect the charger cable to the charger connector (8). The indicator light is on during 4 © 2008 Nokia. All rights reserved.
-
 1
1 -
 2
2 -
 3
3 -
 4
4 -
 5
5 -
 6
6 -
 7
7 -
 8
8 -
 9
9
 |
 |