Nokia C1-01 Nokia C1-01 User Guide in US English - Page 6
End/Power key - charger
 |
UPC - 758478023891
View all Nokia C1-01 manuals
Add to My Manuals
Save this manual to your list of manuals |
Page 6 highlights
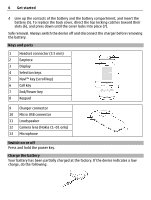
6 Get started 4 Line up the contacts of the battery and the battery compartment, and insert the battery (5). To replace the back cover, direct the top locking catches toward their slots (6), and press down until the cover locks into place (7). Safe removal. Always switch the device off and disconnect the charger before removing the battery. Keys and parts 1 Headset connector (3.5 mm) 2 Earpiece 3 Display 4 Selection keys 5 Navi™ key (scroll key) 6 Call key 7 End/Power key 8 Keypad 9 Charger connector 10 Micro USB connector 11 Loudspeaker 12 Camera lens (Nokia C1-01 only) 13 Microphone Switch on or off Press and hold the power key. Charge the battery Your battery has been partially charged at the factory. If the device indicates a low charge, do the following:
-
 1
1 -
 2
2 -
 3
3 -
 4
4 -
 5
5 -
 6
6 -
 7
7 -
 8
8 -
 9
9 -
 10
10 -
 11
11 -
 12
12 -
13
-
14
-
15
-
16
-
17
-
18
-
19
-
20
-
21
-
22
-
23
-
24
-
25
-
26
-
27
-
28
-
29
-
30
-
31
-
32
-
33
-
34
-
35
-
36
 |
 |
