Nokia Lumia 810 User Guide - Page 15
Charge your phone wirelessly - wireless charging
 |
View all Nokia Lumia 810 manuals
Add to My Manuals
Save this manual to your list of manuals |
Page 15 highlights
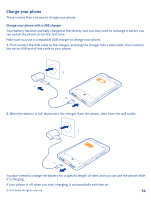
If the battery is completely discharged, it may take several minutes before the charging indicator is displayed or before any calls can be made. Tip: You can use USB charging when a wall outlet is not available. Data can be transferred while charging the device. The efficiency of USB charging power varies significantly, and it may take a long time for charging to start and the device to start functioning. First connect the USB cable to the computer, then to your phone. When the battery is full, first disconnect the USB cable from your phone, then from the computer. Charge your phone wirelessly No need for hassle with cables, just pop your device on a wireless charger, and it immediately starts charging. Your phone supports Qi, the global standard for wireless charging, and is compatible with any Qi wireless charger. The charging areas on the phone and the charger need to touch, so make sure you align the phone and charger properly. Not all phone models fit in all chargers. You need a Nokia Wireless Charging Shell, marked with the Qi logo inside the shell, for wireless charging to work. The shell may be included in the sales box, or it may be available separately. Only use original Nokia Wireless Charging Shells. Nokia Wireless Chargers are available separately. 1. Make sure the wireless charger is turned on. 2. Place your phone on the wireless charger so that the charging areas touch together. 3. When the battery is full, remove your phone from the charger. The charging area is highlighted. © 2012 Nokia. All rights reserved. 15
-
 1
1 -
2
-
3
-
4
-
5
-
6
-
7
-
8
-
9
-
 10
10 -
 11
11 -
 12
12 -
 13
13 -
 14
14 -
 15
15 -
 16
16 -
 17
17 -
 18
18 -
 19
19 -
 20
20 -
21
-
22
-
23
-
24
-
25
-
26
-
27
-
28
-
29
-
30
-
31
-
32
-
33
-
34
-
35
-
36
-
37
-
38
-
39
-
40
-
41
-
42
-
43
-
44
-
45
-
46
-
47
-
48
-
49
-
50
-
51
-
52
-
53
-
54
-
55
-
56
-
57
-
58
-
59
-
60
-
61
-
62
-
63
-
64
-
65
-
66
-
67
-
68
-
69
-
70
-
71
-
72
-
73
-
74
-
75
-
76
-
77
-
78
-
79
-
80
-
81
-
82
-
83
-
84
-
85
-
86
-
87
-
88
-
89
-
90
-
91
-
92
-
93
-
94
-
95
-
96
-
97
-
98
-
99
-
100
-
101
-
102
-
103
-
104
-
105
-
106
-
107
-
108
-
109
-
110
-
111
-
112
-
113
-
114
-
115
-
116
 |
 |
