NordicTrack Apex 4600 Treadmill English Manual - Page 7
Aged When The Power Is Turned On.
 |
View all NordicTrack Apex 4600 Treadmill manuals
Add to My Manuals
Save this manual to your list of manuals |
Page 7 highlights
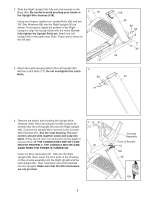
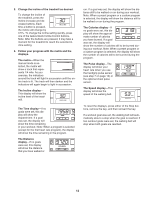
2. Slide the Right Upright (95) fully onto the bracket on the Base (99). Be careful to avoid pinching your hands or 2 90 the Upright Wire Harness (108). Using your fingers, tighten four Upright Bolts (86) and two 3/8" Star Washers (88) into the Right Upright (95) as shown. If necessary, adjust the position of the Right Upright to align the Upright Bolts with the holes. Do not fully tighten the Upright Bolts yet. Attach the Left Upright (90) in the same way. Note: There are no wires on the left side. 3. Attach the Latch Housing (89) to the Left Upright (90) 3 with two Latch Bolts (77). Do not overtighten the Latch Bolts. 89 77 108 95 88 86 86 99 90 4. Remove the elastic band holding the Upright Wire Harness (108). Have two people hold the console assembly near the Left Upright (90) and the Right Upright (95). Connect the Upright Wire Harness to the Console Wire Harness (61). See the inset drawing. The connectors should slide together easily and snap into place. If they do not, turn one connector and try again to connect them. IF THE CONNECTORS ARE NOT CONNECTED PROPERLY, THE CONSOLE MAY BE DAMAGED WHEN THE POWER IS TURNED ON. Insert the Wire Harnesses (61, 108) into the Right Upright (95). Next, insert the front ends of the brackets on the console assembly into the Right Upright and the Left Upright (90). Then, insert the rest of the brackets into the Uprights. Make sure that the Wire Harnesses are not pinched. 4 90 7 Console Assembly Front of Bracket 61 108 95 108
-
 1
1 -
 2
2 -
 3
3 -
 4
4 -
 5
5 -
 6
6 -
 7
7 -
 8
8 -
 9
9 -
 10
10 -
 11
11 -
 12
12 -
13
-
14
-
15
-
16
-
17
-
18
-
19
-
20
-
21
-
22
-
23
-
24
-
25
-
26
-
27
-
28
-
29
-
30
 |
 |
