NordicTrack Audiostride 800 Elliptical English Manual - Page 8
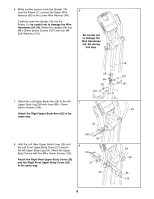
Attach the Right Upper Body Arm 23 in
 |
View all NordicTrack Audiostride 800 Elliptical manuals
Add to My Manuals
Save this manual to your list of manuals |
Page 8 highlights
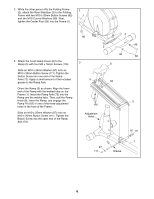
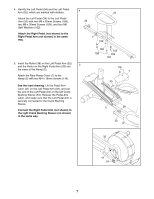
6. While another person holds the Upright (10) near the Frame (1), connect the Upper Wire Harness (65) to the Lower Wire Harness (64). Carefully insert the Upright (10) into the Frame (1); be careful not to damage the Wire Harnesses (64, 65). Attach the Upright with four M8 x 20mm Button Screws (107) and four M8 Split Washers (101). 6 Be careful not to damage the Wire Harnesses (64, 65) during this step. 65 64 101 107 7. Attach the Left Upper Body Arm (22) to the left 7 Upper Body Leg (24) with three M8 x 15mm Button Screws (106). Attach the Right Upper Body Arm (23) in the same way. 22 8. Hold the Left Rear Upper Body Cover (26) and the Left Front Upper Body Cover (27) around the left Upper Body Leg (24). Attach the Upper Body Covers with five M4 x 16mm Screws (116). Attach the Right Rear Upper Body Cover (28) and the Right Front Upper Body Cover (29) in the same way. 106 24 8 116 27 24 10 107 101 1 23 29 28 26 116 8
-
 1
1 -
2
-
 3
3 -
 4
4 -
 5
5 -
 6
6 -
 7
7 -
 8
8 -
 9
9 -
 10
10 -
 11
11 -
 12
12 -
 13
13 -
14
-
15
-
16
-
17
-
18
-
19
-
20
-
21
-
22
-
23
-
24
 |
 |
