NordicTrack Elite 3200 Treadmill English Manual - Page 8
Identify the Gas Spring 88. Note that the Gas Spring
 |
View all NordicTrack Elite 3200 Treadmill manuals
Add to My Manuals
Save this manual to your list of manuals |
Page 8 highlights
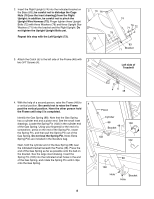
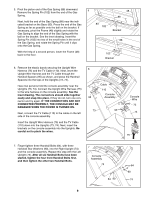
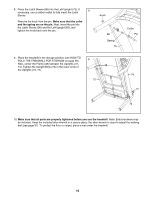
2. Insert the Right Upright (74) into the indicated bracket on the Base (83); be careful not to dislodge the Cage Nuts (76 [see the inset drawing]) from the Right Upright; in addition, be careful not to pinch the Upright Wire Harness (75). Finger tighten three Upright Bolts (72) with three Washers (78) and three Upright Star Washers (71) into the bracket and the Right Upright. Do not tighten the Upright Upright Bolts yet. Repeat this step with the Left Upright (73). 2 73 75 78 72 76 74 78 71 72 83 71 Bracket 3. Attach the Catch (5) to the left side of the Frame (48) with 3 two 3/4" Screws (4). Left side of Treadmill 4 5 48 4. With the help of a second person, raise the Frame (48) to 4 a vertical position. Be careful not to raise the Frame past the vertical position. Have the other person hold the Frame until step 5 is completed. Identify the Gas Spring (88). Note that the Gas Spring has a cylinder end and a piston end. See the small inset drawings. Locate the Spring Pin (102) in the cylinder end of the Gas Spring. Using your fingernail or the end of a screwdriver, press on the end of the Spring Pin, rotate the Spring Pin, and then pull the Spring Pin out of the Gas Spring. Do not lose the Spring Pin. Note: Extra Spring Pins are included in the literature bag. Next, hold the cylinder end of the Gas Spring (88) near the indicated bracket beneath the Frame (48). Press the end of the Gas Spring as far as possible onto the ball on the bracket. See the large inset drawing. Insert the Spring Pin (102) into the indicated small holes in the end of the Gas Spring, and rotate the Spring Pin until it clips onto the Gas Spring. Piston Cylinder 88 102 48 Bracket 102 102 88 102 Hole Bracket Hole 8
-
 1
1 -
2
-
 3
3 -
 4
4 -
 5
5 -
 6
6 -
 7
7 -
 8
8 -
 9
9 -
 10
10 -
 11
11 -
 12
12 -
 13
13 -
14
-
15
-
16
-
17
-
18
-
19
-
20
-
21
-
22
-
23
-
24
-
25
-
26
-
27
-
28
-
29
-
30
-
31
-
32
-
33
-
34
-
35
-
36
-
37
-
38
 |
 |
