Oki C530dn Image Drum Replacement: Priming Cartridges Separate - Page 1
Oki C530dn Manual
 |
View all Oki C530dn manuals
Add to My Manuals
Save this manual to your list of manuals |
Page 1 highlights
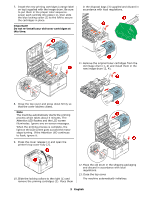
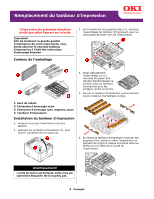
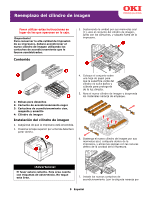
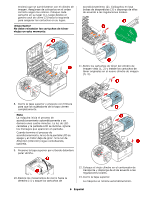
Image Drum Replacement Français, consultez la page 3 • Español, ver página 5• Português, ver página 7 Please use these instructions instead of the ones on the box. Important! To maintain the high quality output from your printer, you must prime the new image drum using the priming cartridges supplied. Contents 3. Holding it by the blue handles (1), lift the image drum assembly, complete with toner cartridges, up and out of the printer. 4. Put the assembly down gently on a piece of paper to avoid damaging the green drum surface and cover it to protect it from light. 1: Disposal Bags 2: Black Priming Cartridge 3: Cyan, Magenta, Yellow Priming Cartridges 4: Image Drum Installing the Image Drum 1. Make sure the printer is on. 2. Press the cover release (1) and open the printer's top cover (2). 5. Open the new image drum and remove all the orange packing materials. Warning! The fuser will be hot. This area is clearly labelled. Do not touch. 6. Holding the new image drum by the blue handles, lower it into the printer, aligning the pegs at each end with the slots in the sides of the printer cavity. 1 English
-
 1
1 -
 2
2 -
 3
3 -
 4
4 -
 5
5 -
 6
6 -
 7
7 -
8
 |
 |