Oki C5800Ldn Guide: User's, C5800Ldn (American English) - Page 70
by its handle, packing tape.
 |
View all Oki C5800Ldn manuals
Add to My Manuals
Save this manual to your list of manuals |
Page 70 highlights
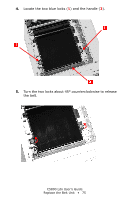
3. Hold the fuser by its handle. Lift the fuser out of the printer. If the fuser is still warm, place it on a flat surface which will not be damaged by heat. After letting the fuser cool down, discard it. c53_60_fuser2.jpg 4. Remove the new fuser from its packaging. Remove any packing tape. 5. Push the orange transport lock to the left to release it. You'll hear it snap. Remove it. c53_104_fuser_transport_loc.jpg C5800 Ldn User's Guide Replace the Fuser • 70
-
 1
1 -
2
-
3
-
4
-
5
-
6
-
7
-
8
-
9
-
10
-
11
-
12
-
13
-
14
-
15
-
16
-
17
-
18
-
19
-
20
-
21
-
22
-
23
-
24
-
25
-
26
-
27
-
28
-
29
-
30
-
31
-
32
-
33
-
34
-
35
-
36
-
37
-
38
-
39
-
40
-
41
-
42
-
43
-
44
-
45
-
46
-
47
-
48
-
49
-
50
-
51
-
52
-
53
-
54
-
55
-
56
-
57
-
58
-
59
-
60
-
61
-
62
-
63
-
64
-
 65
65 -
 66
66 -
 67
67 -
 68
68 -
 69
69 -
 70
70 -
 71
71 -
 72
72 -
 73
73 -
 74
74 -
 75
75 -
76
-
77
-
78
-
79
-
80
-
81
-
82
-
83
-
84
-
85
-
86
-
87
-
88
-
89
-
90
-
91
-
92
-
93
-
94
-
95
-
96
-
97
-
98
-
99
-
100
-
101
-
102
-
103
-
104
-
105
-
106
-
107
-
108
-
109
-
110
-
111
-
112
-
113
-
114
-
115
-
116
-
117
-
118
-
119
-
120
-
121
-
122
-
123
-
124
-
125
-
126
-
127
-
128
-
129
-
130
-
131
-
132
-
133
-
134
-
135
-
136
-
137
-
138
-
139
-
140
-
141
-
142
-
143
-
144
-
145
-
146
-
147
-
148
-
149
-
150
-
151
-
152
-
153
-
154
-
155
-
156
-
157
-
158
-
159
-
160
-
161
-
162
-
163
-
164
-
165
-
166
-
167
-
168
-
169
-
170
-
171
-
172
-
173
-
174
-
175
-
176
-
177
-
178
-
179
-
180
-
181
-
182
-
183
-
184
-
185
-
186
-
187
-
188
-
189
-
190
-
191
-
192
-
193
-
194
-
195
-
196
-
197
-
198
-
199
-
200
-
201
-
202
-
203
-
204
-
205
-
206
-
207
-
208
-
209
-
210
-
211
-
212
-
213
-
214
-
215
-
216
-
217
-
218
-
219
-
220
-
221
-
222
-
223
-
224
-
225
-
226
-
227
-
228
-
229
-
230
-
231
-
232
-
233
-
234
-
235
-
236
-
237
-
238
-
239
-
240
-
241
-
242
-
243
-
244
-
245
-
246
-
247
-
248
-
249
-
250
-
251
 |
 |

C5800 Ldn User°s Guide
Replace the Fuser ± 70
3.
Hold the fuser
by its handle
.
Lift the fuser out of the
printer.
If the fuser is still warm, place it on a flat surface
which will not be damaged by heat
. After letting the fuser
cool down, discard it.
c53_60_fuser2.jpg
4.
Remove the new fuser from its packaging.
Remove any
packing tape.
5.
Push the orange transport lock to the left to release it.
You°ll hear it snap.
Remove it.
c53_104_fuser_transport_loc.jpg