Oki C7300 Hard Disk Drive Install Replacement Instructions - Page 8
Check for Proper Installation
 |
View all Oki C7300 manuals
Add to My Manuals
Save this manual to your list of manuals |
Page 8 highlights
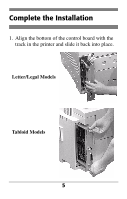
Check for Proper Installation 1. On the printer control panel, press MENU once or twice until INFORMATION MENU appears on the display. 2. Press SELECT. PRINT MENU MAP appears on the display. 3. Press SELECT. The MenuMap prints. 4. Check the MenuMap printout: • At the top of the printout you should see "HDD:20.00 GB." • In the right column you should see a new menu section entitled DISK MAINTENANCE. 5. If you do not see these, remove the control board, lift the hard drive handle and check to be sure that the hard drive is firmly inserted in the connector. Then reinstall the control board and print the Menu Map again. 7
-
 1
1 -
2
-
 3
3 -
 4
4 -
 5
5 -
 6
6 -
 7
7 -
 8
8 -
 9
9 -
 10
10 -
 11
11 -
 12
12 -
 13
13 -
14
-
15
-
16
 |
 |

7
Check for Proper Installation
1.
On the printer control panel, press MENU once
or twice until INFORMATION MENU appears
on the display.
2.
Press SELECT.
PRINT MENU MAP appears on the display.
3.
Press SELECT.
The MenuMap prints.
4.
Check the MenuMap printout:
•
At the top of the printout you should see
"HDD:20.00 GB."
•
In the right column you should see a new
menu section entitled DISK
MAINTENANCE.
5.
If you do not see these, remove the control
board, lift the hard drive handle and check to be
sure that the hard drive is firmly inserted in the
connector. Then reinstall the control board and
print the Menu Map again.