Oki C9300nccs Software Install Setup Guide - Page 11
Install Printer Software, for Windows 2000
 |
View all Oki C9300nccs manuals
Add to My Manuals
Save this manual to your list of manuals |
Page 11 highlights
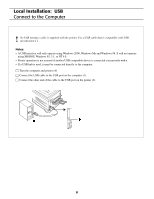
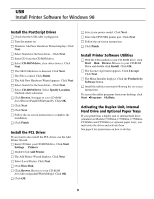
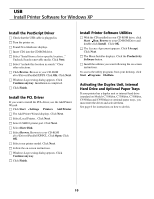
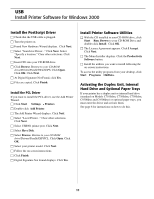
USB Install Printer Software for Windows 2000 Install the PostScript Driver □ Check that the USB cable is plugged. □ Turn the printer on. □ Found New Hardware Wizard displays. Click Next. □ Select "Search for Driver..." Click Next. Select "Specify a location." Clear other selections. Click Next. □ Insert CD1 into your CD-ROM drive. □ Click Browse. Browse to your CD-ROM drive\Drivers\Parallel\Win2k\PS. Click Open. Click OK. Click Next. □ At Digital Signature Not Found, click Yes. □ Files are copied. Click Finish. Install the PCL Driver If you want to install the PCL driver, use the Add Printer ® ® Wizard. □ Click Start Settings Printers □ Double-click Add Printer. □ The Add Printer Wizard displays. Click Next. □ Select "Local Printer..." Clear other selections. Click Next. □ Select USB001 printer port. Click Next. □ Select Have Disk. □ Select Browse. Browse to your CD-ROM drive\Drivers\Parallel\XP\PCL. Click Open. Click OK. □ Select your printer model. Click Next. □ Follow the on-screen instructions. □ Click Finish. □ Digital Signature Not Found displays. Click Yes. Install Printer Software Utilities ® □ With the CD installed in your CD-ROM drive, click Start Run. Browse to your CD-ROM Drive and double-click Install. Click OK. □ The Licence Agreement appears. Click I Accept. Click Next. □ The Menu Installer displays. Click the Productivity Software button. □ Install the utilities you want to install following the on-screen instructions. ® ® To access the utility programs from your desktop, click Start Programs OkiData. Activating the Duplex Unit, Internal Hard Drive and 0ptional Paper Trays If your printer has a duplex unit or internal hard drive (standard on Models C7100dxn, C7300dxn, C7500dxn, C9300dxn and C9500dxn) or optional paper trays, you must enter the driver and activate them. See page 6 for instructions on how to do this. 11
-
 1
1 -
2
-
3
-
4
-
5
-
 6
6 -
 7
7 -
 8
8 -
 9
9 -
 10
10 -
 11
11 -
 12
12 -
 13
13 -
 14
14 -
 15
15 -
 16
16 -
17
-
18
-
19
-
20
 |
 |