Oki GL408e GL408e/GL412e Real Time Clock Guide - Page 6
GL4xxe Real-Time-clock Installation
 |
View all Oki GL408e manuals
Add to My Manuals
Save this manual to your list of manuals |
Page 6 highlights
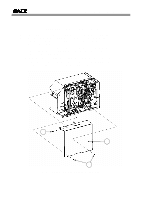
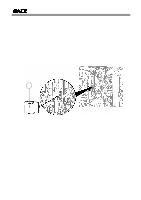
Real-Time Clock Installation Guide GL4xxe Real-Time-clock Installation 4. Insert the chip labelled (3) into the socket, making sure that Pin 1 of the chip is aligned to Pin 1 of the socket. Mount it into place firmly. 5. Reinstall the Left-Side cover and reconnect the interface card, power and signal cables. 6. Turn the printer ON and proceed to the next page for instructions on setting the clock. 3 6
-
 1
1 -
 2
2 -
 3
3 -
 4
4 -
 5
5 -
 6
6 -
 7
7 -
 8
8
 |
 |

6
Real-Time Clock Installation Guide
GL4xxe Real-Time-clock Installation
4.
Insert the chip labelled (3) into the socket, making sure that Pin 1 of the chip
is aligned to Pin 1 of the socket. Mount it into place firmly.
5.
Reinstall the Left-Side cover and reconnect the interface card, power and
signal cables.
6.
Turn the printer ON and proceed to the next page for instructions on setting
the clock.
3