Oki GL408e GL408e/GL412e WLAN Card Install Guide - Page 5
GL4xxe Wireless LAN Card Installation
 |
View all Oki GL408e manuals
Add to My Manuals
Save this manual to your list of manuals |
Page 5 highlights
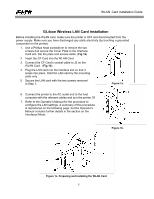
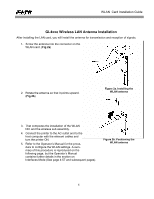
WLAN Card Installation Guide GL4xxe Wireless LAN Card Installation Before installing the WLAN card, make sure the printer is OFF and disconnected from the power supply. Make sure you have discharged any static electricity (by touching a grounded component on the printer). 1. Use a Phillips head screwdriver to remove the two screws that secure the Cover Plate to the Interface Card slot. Set the plate and screws aside. (Fig 1a) 2. Insert the CF Card into the WLAN Card. 3. Connect the CF Card's coaxial cable to J2 on the WLAN Card. (Fig 1b) 4. Plug the LAN card into the interface slot so that it snaps into place. Hold the LAN card by the mounting plate only. 5. Secure the LAN card with the two screws removed in Step 1. Figure 1a. 6. Connect the printer to the AC outlet and to the host computer with the relevant cables and turn the printer ON. 7. Refer to the Operator's Manual for the procedure to configure the LAN settings. A summary of this procedure is reproduced on the following page, but the Operator's Manual contains further details in the section on the Interfaces Mode. Figure 1b. Figure 1c. Preparing and installing the WLAN Card 5
-
 1
1 -
 2
2 -
 3
3 -
 4
4 -
 5
5 -
 6
6 -
 7
7 -
 8
8 -
 9
9 -
 10
10 -
 11
11 -
12
-
13
-
14
 |
 |
