Oki GL408e GL408e/GL412e Simple Dispenser Guide - Page 6
Simple-Dispenser Installation Guide
 |
View all Oki GL408e manuals
Add to My Manuals
Save this manual to your list of manuals |
Page 6 highlights
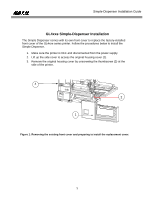
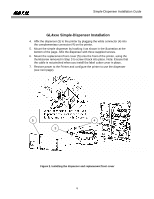
Simple-Dispenser Installation Guide GL4xxe Simple-Dispenser Installation 4. Affix the dispenser (3) to the printer by plugging the white connector (4) into the complementary connector (4) on the printer. 5. Mount the simple dispenser by hooking it as shown in the illustration at the bottom of the page. Affix the dispenser with three supplied screws. 6. Mount the replacement front cover (5) onto the front of the printer, using the thumbscrew removed in Step 3 to screw it back into place. Note: Ensure that the cable is not pinched when you install the label cutter cover in place. 7. Restore power to the Printer and configure the printer to use the dispenser (see next page). 5 4 3 Figure 2. Installing the dispenser and replacement front cover 6
-
 1
1 -
 2
2 -
 3
3 -
 4
4 -
 5
5 -
 6
6 -
 7
7 -
 8
8
 |
 |
