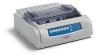
Oki ML490 Microline 420/421 & 490/491 Setup Guide - Page 20
If Digital Signature Not Found displays, click - windows 7 driver
 |
View all Oki ML490 manuals
Add to My Manuals
Save this manual to your list of manuals |
Page 20 highlights
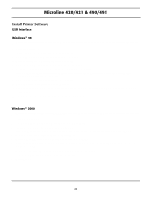
Microline 420/421 & 490/491 Install Printer Software USB Interface Windows® 98 ! Before you start the install, be sure the USB cable is connected to your printer and PC, and your printer is powered off. 1. Turn the printer on. 2. Insert the CD-ROM provided with your printer. 3. Add New Hardware Wizard appears. Click Next. 4. Select Search for a better driver... Click Next. 5. Select CD-ROM and specify the location. Click Next. 6. Windows finds the OKI USB Driver. Click Next. Click Finish. If the OKI Menu Installer displays, click Cancel to close it and continue the installation using Add Printer Wizard. 7. The printer is detected. Click Next. 8. Select Search for the best driver... Click Next. 9. Select Specify a location and click Browse. 10. Browse to your CD-ROM drive, Drivers, [Printer Model], [Operating System], [Language]. Click OK. 11. Click Next. 12. Follow the on-screen instructions to finish the installation. Windows® 2000 ! Before you start the install, be sure the USB cable is connected to your printer and PC, and your printer is powered off. 1. Turn on the printer. 2. The Found New Hardware Wizard appears. Click Next. 3. Insert the CD-ROM provided with your printer. If the OKI Menu Installer displays, click Cancel to close it and continue the installation using Add Printer Wizard. 4. Select Search for a suitable driver... Click Next. 5. Select CD-ROM drive and Specify a location. Click Next. 6. Browse to your CD-ROM drive, Drivers, [Printer Model], Win2K, [Language], oemprint.inf. Click Open. Click OK. 7. Windows indicates the driver is found for this device. Click Next. If Digital Signature Not Found displays, click Yes. 8. Click Finish. 20
-
 1
1 -
2
-
3
-
4
-
5
-
6
-
7
-
8
-
9
-
10
-
11
-
12
-
13
-
14
-
 15
15 -
 16
16 -
 17
17 -
 18
18 -
 19
19 -
 20
20 -
 21
21 -
 22
22 -
 23
23 -
 24
24
 |
 |