Olympus 228825 User Manual - Page 28
Taking pictures with [PC], Set the shooting mode to, to select [Auto] or [Manual] and, then press
 |
View all Olympus 228825 manuals
Add to My Manuals
Save this manual to your list of manuals |
Page 28 highlights
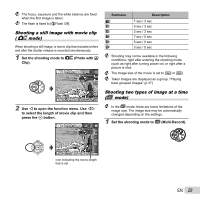
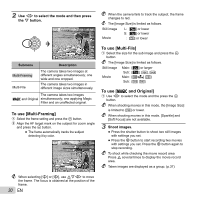
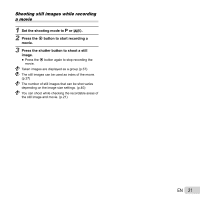
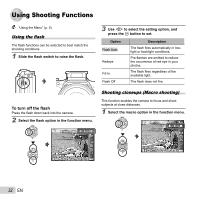
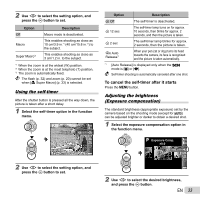
5 Repeat steps 3 and 4 to take a third frame. ● After the third frame is taken, the camera automatically processes the frames and the combined panorama image is displayed. To exit the panorama function without saving an image, press the m button. Taking pictures with [PC] 1 Use FGHI to select the direction that the frames are combined. 2 Press the shutter button to take the first frame, and then point the camera for the second frame. The shooting procedure is same as that of [Manual]. Panorama shooting is possible for up to 10 frames. 3 Repeat Step 2 until the number of desired frames is taken, and then press the A button or m button when finished. Refer to the PC software help guide for details on how to make panorama images. Shooting 3D images (W mode) In this mode, 3D images are shot for viewing on 3D-compatible display devices. Images shot in 3D mode cannot be displayed in 3D on this camera's monitor. 1 Set the shooting mode to W. 2 Use HI to select [Auto] or [Manual] and then press the A button. 28 EN 3D Auto AUTO MANUAL 0.0 00:34 4 16M NORM MENU Submenu Auto Manual Description The camera automatically shoots the second frame to create a 3D image. You shoot the second frame to create a 3D image by following the guide on the monitor. Depending on the subject or the situation (if the distance between the camera and subject is too short), the image may not look 3D. The 3D viewing angle varies depending on the subject, etc. Taking pictures with [Auto] 1 Press the shutter button to shoot the first frame. 2 Move the camera horizontally. The image is automatically taken when the subject overlaps the translucent image that is displayed on the monitor. Taking pictures with [Manual] 1 Press the shutter button to shoot the first frame. 2 Move the camera in the same way as [Auto] to decide the position, and then press the shutter button. The first shot image is displayed on the monitor lightly. Decide the position by referencing the image. To exit 3D shooting mode without saving an image, press the m button. The [Image Size] (p. 40) is fixed to [0]. The zoom ratio is fixed.
-
 1
1 -
2
-
3
-
4
-
5
-
6
-
7
-
8
-
9
-
10
-
11
-
12
-
13
-
14
-
15
-
16
-
17
-
18
-
19
-
20
-
21
-
22
-
 23
23 -
 24
24 -
 25
25 -
 26
26 -
 27
27 -
 28
28 -
 29
29 -
 30
30 -
 31
31 -
 32
32 -
 33
33 -
34
-
35
-
36
-
37
-
38
-
39
-
40
-
41
-
42
-
43
-
44
-
45
-
46
-
47
-
48
-
49
-
50
-
51
-
52
-
53
-
54
-
55
-
56
-
57
-
58
-
59
-
60
-
61
-
62
-
63
-
64
-
65
-
66
-
67
-
68
-
69
-
70
-
71
-
72
-
73
-
74
-
75
-
76
-
77
-
78
-
79
-
80
-
81
-
82
-
83
-
84
 |
 |
