Olympus C-3000 C-3000 Zoom Quick Start Guide (202KB) - Page 2
Enjoy Your Pictures, Optional Accessories - camedia zoom
 |
UPC - 050332131286
View all Olympus C-3000 manuals
Add to My Manuals
Save this manual to your list of manuals |
Page 2 highlights
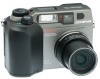
C-3000Z QSG 00/3/29 0.3.29 17:23 Page 2 World Leaders in Film and Filmless Photography Taking Pictures with Your Olympus C-3000ZOOM Go...and Start Taking Pictures Now you're ready to take great pictures-or short movies-with the C-3000ZOOM! 1. Choose your recording mode using the Power/Mode Dial: • P (Program) for fully automatic operation. The C-3000ZOOM automatically sets the proper exposure, f-stop and shutter settings for easy, point-and-shoot filmless photography. • A/S/M to set the aperture or shutter speed, or both, yourself. With the dial set to this mode, press the MENU button and use the Jog Dial to select A/S/M MODE and press the right arrow to confirm. Now, using the Jog Dial: - select A to manually control the f-stop between f/2.8 and f/11; the shutter speed is determined automatically. (The longest available shutter speed varies according to the ISO setting.) - select S to manually control the shutter speed between 4 seconds and 1/800 second; the aperture setting is determined automatically. When the auto flash is selected, the minimum shutter speed is 1/30. - select M to manually control both aperture and shutter settings from 16 seconds to 1/800 second for creative exposure. • In the mode, movie pictures with sound appear. 2. For telephoto or wide-angle shooting, use the 3X zoom lever, which is located next to the Power/Mode Dial. Simply press the lever toward T to zoom in with telephoto; press it towards W to zoom out. Note: The optical zoom lens is an internal zoom, so zooming in and out will not cause the lens barrel to retract or extend. However, in the mode, only digital zoom can be used, so the view through the optical viewfinder does not change. 3. Use the color LCD monitor to make specific adjustments to picture settings. With the Mode Dial set to P or A/S/M, access the Menu screens by pressing the button. The first menu to appear is the picture record menu. Use the top and bottom arrows to scroll through the selections, then press the right arrow to adjust that selection. Press the left arrow to confirm each adjustment and the OK button to save it and exit the menu. You can make the following adjustments to picture settings (in the P or A/S/M mode) or to movie picture settings where * is noted when the Mode Dial is set to . DRIVE: Choose for taking multiple, rapid-fire shots of the same subject, with the focus, exposure and white balance measured for the first frame; choose AF to have the exposure, white balance and autofocus measured for each frame. Select for selftimer/remote control operation, or for sequential recording with different exposures. Note: This feature is not available in the Manual mode. WHITE BALANCE*: Enter your light setting using the Jog Dial: AUTO, DAYLIGHT , CLOUDY , INDOOR or COMMERCIAL FLUORESCENT lighting. ISO SETTINGS*: Equivalent to film speed settings in your C-3000ZOOM. Select from AUTO, 100, 200 or 400. The higher the ISO, the faster the shutter speed that can be used and the lower amount of light required. Note: You may select ISO sensitivity in the P or mode. FLASH COMPENSATION: Flash volume can be adjusted by ±2 in 1/3 EV steps. SLOW SYNCHRO FLASH: Produce creative effects by setting the flash to fire during the beginning (1) or ending (2) of the shutter release duration. Great for nighttime photography and capturing streaks of light from moving subjects such as fireworks or automobile taillights! FLASH FLASH SELECTION: Choose between the built-in flash plus extension flash, or extension flash only. With the optional FL-40 Extension Flash, bounce shooting can be performed easily. DIGITAL ZOOM: Make your subject appear 1.6x, 2x or 2.5x as large. When used with the 3x optical zoom, you can take photographs equivalent to a 7.5x enlargement. You can easily switch between optical zoom and digital telephoto shooting with the zoom lever. FUNCTION*: Select from four special effects-BLACK & WHITE, SEPIA, WHITE BOARD or BLACK BOARD. SOUND RECORDING: When shooting still images, sound is simultaneously recorded for 4 seconds. Note: Sound cannot be recorded with a picture in TIFF mode, however, it can be added later during playback. PANORAMA MODE: Lock exposure, utilize panorama guides and flag images in the camera for panoramic pictures. RECORDING MODE*: Choose an image resolution setting: Standard (SQ1/SQ2), or one of the High Quality Modes (HQ/SHQ/TIFF). The amount of frames you can store on a SmartMedia card depends on the resolution you've selected. See the chart below: Number of Still Pictures that Can be Taken Recording Mode TIFF Number of 2048 1600 1280 1024 640 Pixels x x x x x 1536 1200 960 768 480 File Type SHQ 2048 x 1536 HQ 2048 x 1536 SQ1 1600 x 1200 1280 x 960 High Normal High Normal Mem. Capacity TIFF JPEG 8MB 0 1 2 3 8 4 10 6 16 10 24 (Without sound) SQ2 1024 x 768 640 x 480 High Normal High Normal 13 37 32 82 16MB 1 2 4 6 17 8 21 12 31 21 49 26 76 66 165 Note: When mode is selected, either HQ (320 x 240) or SQ (160 x 120) can be selected for movie recording. With an 8MB SmartMedia card, approx. 23 seconds (HQ) and approx. 92 seconds (SQ) can be recorded. 4. In addition to the automatic exposure, you can manually adjust exposure compensation. Use the right arrow of the Jog Dial to increase exposure, use the left arrow of the Jog Dial to decrease exposure. You can confirm the settings by turning on the color LCD monitor. 5. In low-light or backlit situations, the flash will fire automatically; you may also select specific flash modes by pressing the FLASH button located to the right of the viewfinder. Press this button once for RED-EYE REDUCTION FLASH to reduce the phenomena of red-eye; twice for FILL-IN FLASH for forced flash activation or three times for OFF for forced off flash. The selected flash mode icon appears on the control panel. 6. Point and Shoot. You can take pictures or record movies using the optical viewfinder or the color LCD monitor as your viewfinder. To take pictures using the color LCD monitor, set the Mode Dial to P or A/S/M. In the P mode, you'll need to press the button. To record movies, turn the mode dial to . Then... • Compose your subject. • Depress the shutter release button halfway. The green lamp will light when focused. • Depress the shutter release button fully to take the picture, or to begin recording. (The orange lamp lights while recording. To stop recording depress the shutter release button again.) • Two short beeps indicate the shot or movie has been taken. • When the Card access lamp stops blinking you're ready to take your next picture or record your next movie. Wear glasses? Use the diopter adjustment dial to adjust the viewfinder until the cross hairs are sharp, now everything in the viewfinder is in perfect focus. ? Still Having Problems with Your Olympus Camera? Call 1-888-553-4448 for Technical Support Enjoy Your Pictures With the C-3000ZOOM, you can easily view, save and download the photos and movies you want-and delete the ones you don't. Viewing Pictures • After you've taken a picture, you can view it immediately on the color LCD monitor by quickly pressing the button twice. • To review the pictures stored in the camera, select the Dispaly Mode on the Power/Mode Dial. Use the right/left arrows on the Jog Dial to scroll through all the pictures saved on your SmartMedia card. • To play a movie-pictures noted with on the LCD monitor-press the MENU button, then use the top and bottom arrows on the Jog Dial to select MOVIE PLAY. Press the right arrow to select START, then press the OK button. To stop the movie, press the MENU button again. • To display a multiple number of images selected in the Index-Display mode, simply press the Zoom lever toward W. Press toward T to return to single image display. Pressing toward T multiple times in single frame display mode enlarges the image up to 3x on the color LCD monitor for easier viewing. This is also known as the Image Review. • Up to 4 seconds of sound can be added to still images. Select from the Menu and press the OK button with START selected. This function is available in TIFF mode. Note: Sound playback is not possible with the camera. • You also can review these pictures (with sound if recorded) through any video source such as a Video or TV monitor with standard NTSC video input capabilities. Simply connect the C-3000ZOOM to the "VIDEO IN" and "AUDIO IN" jacks on the video device using the A/V cable (yellow pin plug to "VIDEO IN" ; white pin plug to "AUDIO IN" ) included with your camera. Saving Pictures • To save a picture, you must be in the Display Mode . Press the OK button while the image you want to save is displayed on the color LCD monitor. The lock icon will appear on the color LDC monitor. (To cancel protection, press the OK button again.) Deleting Pictures • To delete a picture, press the Erase button , select YES then press the OK button. When you delete a picture, you've instantly freed up space on your SmartMedia card for more pictures and movies. So with the C-3000ZOOM, there's no more wasted film or developing costs for images you don't really want. Downloading Pictures • Please refer to your Olympus Digital Camera Owner's Manual for easy-to-follow instructions on how to install the enclosed software titles that will enable you to download, view, edit, manipulate and store your images on your computer. Optional Accessories For even more photographic creativity and enjoyment, Olympus offers a variety of optional accessories for use with your C-3000ZOOM Filmless Digital Camera: • NiMH rechargeable batteries and Rapid Recharger for long-lasting power. • AC adapter (C-7AU) to ensure a consistent power supply when downloading images.. • Photo Printers for Olympus Digital Cameras. • 1.45X Telephoto Lens (150mm equivalent) • Additional SmartMedia Cards in 8MB, 16MB, 32MB and 64MB Sizes • B-300 Telephoto Lens (180mm equivalent) • MAUSB-1 USB Reader/Writer • Carrying Case • MA-2 PCMCIA Card Adapter • Accessory Kits • MF-2 FlashPath Floppy Disk Adapter • B-28 Wide Angle Lens (28mm equivalent) • FL-40 Extension Flash • FL-BK01 Grip • FL-CB01 Cable • For best results with your inkjet printer, use the Olympus CAMEDIA/Pictorico branded papers. For more information, visit us online at www.olympus.com/digital, call 1-888-553-4448 or contact your local authorized Olympus digital camera dealer. Olympus is the registered trademark of Olympus LTD. Tokyo All other trademarks and registered marks contained herein are recognized as property of their respective holders and are hereby acknowledged.
-
 1
1 -
 2
2
 |
 |
