Olympus C-750 C-750 Ultra Zoom Reference Manual - English (8.7 MB) - Page 24
Removing the card, then let it return slowly.
 |
UPC - 050332140752
View all Olympus C-750 manuals
Add to My Manuals
Save this manual to your list of manuals |
Page 24 highlights
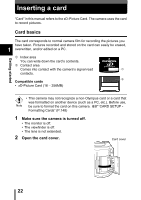
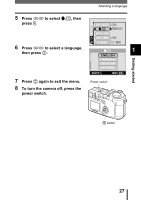
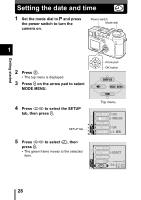
Inserting a card 3 Insert the card in the appropriate direction. • Insert the card while keeping it straight. • The card will stop with a click when it is inserted all the way to the end. • Inserting the card the wrong way or at an angle could damage the contact area or cause the card to jam. • If the card is not inserted all the way, data may not 1 be written to the card. Notch Index area side Getting started Card inserted correctly 4 Close the card cover securely until it clicks. Removing the card 1 Push the card all the way in to unlock it, then let it return slowly. • The card is ejected a short way and then stops. Hold the card straight and pull it out. Note Releasing your finger quickly after pushing the card all the way in may cause it to eject forcefully out of the slot. • Do not press on the card with hard or pointed items such as ballpoint pens. • Never open the card cover, or remove the card or the batteries while Note the camera is turned on. Doing so could destroy the data stored on the card. Once destroyed, data cannot be restored. 23
-
 1
1 -
2
-
3
-
4
-
5
-
6
-
7
-
8
-
9
-
10
-
11
-
12
-
13
-
14
-
15
-
16
-
17
-
18
-
 19
19 -
 20
20 -
 21
21 -
 22
22 -
 23
23 -
 24
24 -
 25
25 -
 26
26 -
 27
27 -
 28
28 -
 29
29 -
30
-
31
-
32
-
33
-
34
-
35
-
36
-
37
-
38
-
39
-
40
-
41
-
42
-
43
-
44
-
45
-
46
-
47
-
48
-
49
-
50
-
51
-
52
-
53
-
54
-
55
-
56
-
57
-
58
-
59
-
60
-
61
-
62
-
63
-
64
-
65
-
66
-
67
-
68
-
69
-
70
-
71
-
72
-
73
-
74
-
75
-
76
-
77
-
78
-
79
-
80
-
81
-
82
-
83
-
84
-
85
-
86
-
87
-
88
-
89
-
90
-
91
-
92
-
93
-
94
-
95
-
96
-
97
-
98
-
99
-
100
-
101
-
102
-
103
-
104
-
105
-
106
-
107
-
108
-
109
-
110
-
111
-
112
-
113
-
114
-
115
-
116
-
117
-
118
-
119
-
120
-
121
-
122
-
123
-
124
-
125
-
126
-
127
-
128
-
129
-
130
-
131
-
132
-
133
-
134
-
135
-
136
-
137
-
138
-
139
-
140
-
141
-
142
-
143
-
144
-
145
-
146
-
147
-
148
-
149
-
150
-
151
-
152
-
153
-
154
-
155
-
156
-
157
-
158
-
159
-
160
-
161
-
162
-
163
-
164
-
165
-
166
-
167
-
168
-
169
-
170
-
171
-
172
-
173
-
174
-
175
-
176
-
177
-
178
-
179
-
180
-
181
-
182
-
183
-
184
-
185
-
186
-
187
-
188
-
189
-
190
-
191
-
192
-
193
-
194
-
195
-
196
-
197
-
198
-
199
-
200
-
201
-
202
-
203
-
204
-
205
-
206
-
207
-
208
-
209
-
210
-
211
-
212
-
213
-
214
-
215
-
216
-
217
-
218
-
219
-
220
-
221
-
222
-
223
-
224
-
225
-
226
-
227
-
228
-
229
-
230
-
231
-
232
-
233
-
234
-
235
-
236
-
237
-
238
 |
 |
