Olympus DP-201 DP-201 Instructions (English) - Page 1
Olympus DP-201 Manual
 |
View all Olympus DP-201 manuals
Add to My Manuals
Save this manual to your list of manuals |
Page 1 highlights
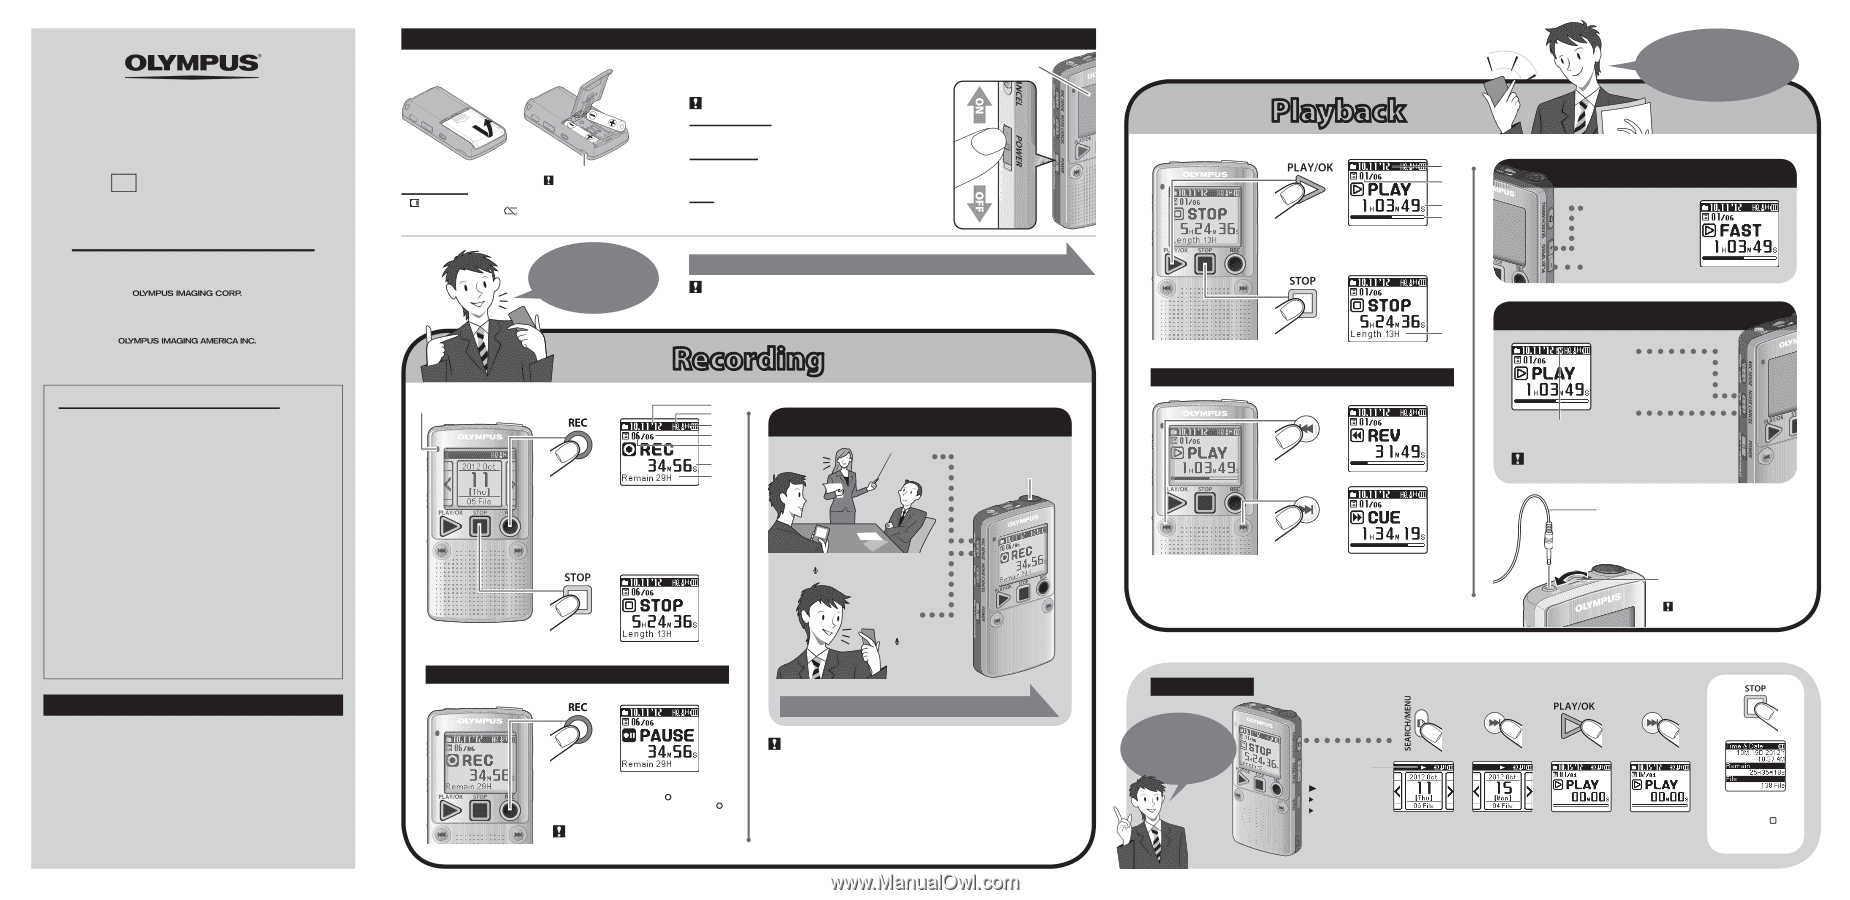
VOICE RECORDER NOTE CORDER DP-201 EN INSTRUCTIONS Thank you for purchasing an Olympus Digital Voice Recorder. Please read these instructions for information about using the product correctly and safely. Keep the instructions handy for future reference. To ensure successful recordings, we recommend that you test the record function and volume before use. Shinjuku Monolith, 3-1 Nishi-Shinjuku 2-chome, Shinjuku-ku, Tokyo 163-0914, Japan. Tel. +81 (0)3-3340-2111 http://www.olympus.com 3500 Corporate Parkway, P.O. Box 610, Center Valley, PA 18034-0610, U.S.A. Tel. 1-888-553-4448 http://www.olympusamerica.com For customers in North and South America USA RFI: This equipment has been tested and found to comply with the limits for a Class B digital device, pursuant to part 15 of the FCC Rules. These limits are designed to provide reasonable protection against harmful interference in a residential installation. This equipment generates, uses and can radiate radio frequency energy and, if not installed and used in accordance with the instructions, may cause harmful interference to radio communications. However, there is no guarantee that interference will not occur in a particular installation. If this equipment does cause harmful interference to radio or television reception, which can be determined by turning the equipment off and on, the user is encouraged to try to correct the interference by one or more of the following measures: • Reorient or relocate the receiving antenna. • Increase the separation between the equipment and receiver. • Connect the equipment into an outlet on a circuit different from that to which the receiver is connected. • Consult the dealer or an experienced radio/TV technician for help. Canadian RFI: This digital apparatus does not exceed the Class B limits for radio noise emissions from digital apparatus as set out in the Radio Interference Regulations of the Canadian Department of Communications. Cet appareil numérique ne dépasse pas les limites de Catégorie B pour les émissions de bruit radio émanant d'appareils numériques, tel que prévu dans les Règlements sur l'Interférence Radio du Département Canadien des Communications. Introduction • The contents of this document may be changed in the future without advanced notice. Contact our Customer Support Center for the latest information relating to product names and model numbers. • The screen and recorder illustrations shown in this manual were produced during the development stages and may differ from the actual product. The utmost care has been taken to ensure the integrity of the contents of this document. In the unlikely event that a questionable item, error, or omission is found, please contact our Customer Support Center. • Any liability for passive damages or damage of any kind occurred due to data loss incurred by a defect of the product, repair performed by the third party other than Olympus or an Olympus authorized service station, or any other reason is excluded. U1-BS0952-01 TR1111 ``` ``` Getting started 1 Insert batteries. 2 Turn on the power. Slide the POWER switch to ON. • Be sure to remove the protective film on the display before using this product. To turn off the power: ``` While the recorder is in the stop mode, slide the POWER switch to OFF/HOLD. Power save mode: Battery indicator: Strap eyelet • A strap is not supplied with this product. If [ ] is displayed on the screen, replace batteries as soon as possible. If the battery level becomes too low, [ ] and [Battery Low] are displayed and then the recorder automatically turns off. If no operations are performed for more than 10 minutes when the power is on, the display automatically turns off and the recorder enters the power save mode. To exit the power save mode, press any button. HOLD: If sliding the POWER swich to OFF/HOLD while the recorder is in operation, all buttons and switches are disabled without interrupting the current operations. Protective film You can change the recording mode! Set the time and date. "Setting time and date" (Verso) • The [Set Time & Date] screen appears when you use the recorder for the first time or when the recorder is turned on after more than 30 minutes without power supply. • If the time and date are not set, the time and date of the default settings are recorded to files . Recording Recording indicator lights while recording. a b c d e f g a Current date b Recording mode indicator c Microphone sensitivity indicator d Total number of recorded files for the date e Current file number f Elapsed recording time g Remaining recording time Microphone sensitivity High Turn the microphone toward a sound source to be recorded. Highly sensitive mode which can record surrounding noises (H) Pause Low Standard sensitivity (L) Select the sensitivity according to the surrounding conditions. "Changing the recording mode" (Verso) To pause recording, press the REC (-) button while recording. To resume the recording, press the REC (-) button again. • Recording is automatically stopped if 60 minutes elapsed after recording is paused. • To ensure successful recordings, we recommend you to test recording with the selected functions and volume beforehand. • To ensure recording from the beginning, start recording a sound source after the recording indicator lights. • The recorder cannot record if [Memory Full] or [Maximum File Size is reached] is displayed. Delete unnecessary files to free up some space in memory. • If the recorder is placed directly on a table, the vibrations of the table are likely to be recorded. To record sound clearly, place a notebook or handkerchief between the recorder and the table to prevent the vibrations from being recorded. • When the available recording time becomes less than 60 seconds, the recording indicator starts flashing. The indicator flashes faster if the available time decreases to 30 seconds and to 10 seconds. Playback a b c d a Recording date b Current file number c Elapsed playback time d Playback position bar indicator Forwarding and Rewinding e e Approximate file length Press and hold s To fast-forward or rewind a file, press and hold 0 or 9 button while playing back a file. s To skip to the next file or previous file, press 0 or 9 button. s Fast-forwarding or rewinding continues to the next file. Recorded files are grouped by date. Changing the playback speed Fast Playback speed is changed between 0.5x, 0.75x, normal, 1.2x, 1.5x, and 2.0x by each press of the buttons. Slow Noise cancel On Noise is reduced when played back to achieve better sound quality. Noise Cancel indicator Off The file is played back as it was recorded. • When the NOISE CANCEL switch is set to ON, playback speed returns to normal. When an earphone is connected, the speaker is turned off. Playback sound for an earphone is monaural. High Low Volume To avoid irritation to the ear, turn down the volume before inserting an earphone. Do not raise the volume too high when using an earphone. It may cause hearing impairment and a decrease in hearing ability. • An earphone is not supplied with this product. File search Search for files by the date they were recorded. sWhen searching for a file recorded on October 15. ``` ``` ``` Recorder status indicator : During playback F : During fast playback S : During slow playback The date display appears. Select October 15. The first file is played back. If the file is skipped, the recorder plays back the next file. When the recorder is in stop mode, press and hold the STOP (/) button to display the [Time & Date] and [Remain].
-
 1
1 -
 2
2
 |
 |