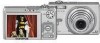
Olympus FE 250 FE-250 Instruction Manual (English) - Page 12
Shooting pictures by selecting a scene mode according to, the situation, Follow the shooting guide
 |
UPC - 050332159877
View all Olympus FE 250 manuals
Add to My Manuals
Save this manual to your list of manuals |
Page 12 highlights
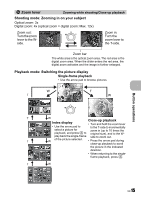
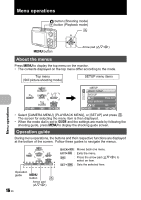
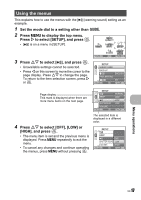
f Shooting pictures by selecting a scene mode according to the situation Select from 10 available scene modes, according to the shooting conditions. Press for setting. j SPORT /N INDOOR /W CANDLE /R SELF PORTRAIT /S SUNSET /X FIREWORKS / PET /V CUISINE /d DOCUMENTS /i AUCTION • The factory default settings are displayed in gray ( ). 1 SPORT BACK MENU SET OK • The scene selection screen displays sample images and the shooting mode to best suit the situation. • To switch to a different scene mode after a scene mode has been selected, press m to select [SCENE] from the top menu and display the scene selection screen. • By switching to another scene, most settings will be changed to the default settings of each scene. R Follow the shooting guide for setting SHOOTING GUIDE 1/3 1 Brightening subject. 2 Shooting into backlight. 3 Blurring background. 4 Adjusting area in focus. 5 Shooting subject in motion. SET OK Follow the shooting guide displayed on the screen to set the target items. • Press m to display the shooting guide again. • To change the setting without using the shooting guide, set the shooting mode to another one. • The content set using the shooting guide will change to the default setting by pressing m or changing the mode using the mode dial. n Recording movies Audio is recorded with the movie. • During audio recording, only the digital zoom can be used. To record the movie with the optical zoom, set [R] to [OFF]. g "R (movie) Recording movies with or without sound" (P. 20) A This lights red during movie recording. Button operations 00:36 The remaining recording time is displayed. When the remaining recording time reaches 0, recording stops. 6 Arrow pad (ONXY) Use the arrow pad to select scenes, playback picture, and the items on the menus. 12 EN
-
 1
1 -
2
-
3
-
4
-
5
-
6
-
 7
7 -
 8
8 -
 9
9 -
 10
10 -
 11
11 -
 12
12 -
 13
13 -
 14
14 -
 15
15 -
 16
16 -
 17
17 -
18
-
19
-
20
-
21
-
22
-
23
-
24
-
25
-
26
-
27
-
28
-
29
-
30
-
31
-
32
-
33
-
34
-
35
-
36
-
37
-
38
-
39
-
40
-
41
-
42
-
43
-
44
-
45
-
46
-
47
-
48
-
49
-
50
-
51
-
52
-
53
-
54
-
55
-
56
-
57
-
58
-
59
-
60
-
61
-
62
-
63
-
64
-
65
-
66
-
67
-
68
-
69
-
70
-
71
-
72
-
73
-
74
-
75
-
76
 |
 |
