Olympus FE 300 FE-300 Instruction Manual (English) - Page 38
Connecting the camera to a computer, Start up the OLYMPUS Master software
 |
View all Olympus FE 300 manuals
Add to My Manuals
Save this manual to your list of manuals |
Page 38 highlights
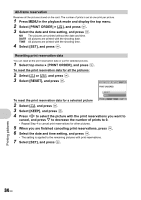
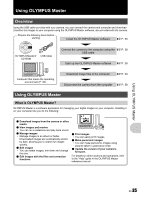
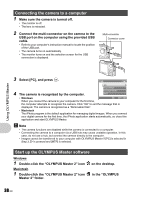
Connecting the camera to a computer 1 Make sure the camera is turned off. • The monitor is off. • The lens is retracted. 2 Connect the multi-connector on the camera to the USB port on the computer using the provided USB cable. • Refer to your computer's instruction manual to locate the position of the USB port. • The camera turns on automatically. • The monitor turns on and the selection screen for the USB connection is displayed. Multi-connector Connector cover Using OLYMPUS Master 3 Select [PC], and press . USB PC EASY PRINT 4 The camera is recognized by the computer. CUSTOM PRINT EXIT • Windows SET OK When you connect the camera to your computer for the first time, the computer attempts to recognize the camera. Click "OK" to exit the message that is displayed. The camera is recognized as a "Removable Disk". • Macintosh The iPhoto program is the default application for managing digital images. When you connect your digital camera for the first time, the iPhoto application starts automatically, so close this application and start OLYMPUS Master. Note • The camera functions are disabled while the camera is connected to a computer. • Connecting the camera to a computer via a USB hub may cause unstable operation. In this case, do not use a hub, but connect the camera directly to the computer. • Images cannot be transferred to your computer with OLYMPUS Master if [PC] is selected in Step 3, Y is pressed and [MTP] is selected. Start up the OLYMPUS Master software Windows 1 Double-click the "OLYMPUS Master 2" icon Macintosh 1 Double-click the "OLYMPUS Master 2" icon Master 2" folder. on the desktop. in the "OLYMPUS 38 EN
-
 1
1 -
2
-
3
-
4
-
5
-
6
-
7
-
8
-
9
-
10
-
11
-
12
-
13
-
14
-
15
-
16
-
17
-
18
-
19
-
20
-
21
-
22
-
23
-
24
-
25
-
26
-
27
-
28
-
29
-
30
-
31
-
32
-
 33
33 -
 34
34 -
 35
35 -
 36
36 -
 37
37 -
 38
38 -
 39
39 -
 40
40 -
 41
41 -
 42
42 -
 43
43 -
44
-
45
-
46
-
47
-
48
-
49
-
50
-
51
-
52
-
53
-
54
-
55
-
56
-
57
-
58
-
59
-
60
-
61
-
62
-
63
-
64
-
65
-
66
-
67
-
68
 |
 |
