Olympus FE-4030 FE-4030 Instruction Manual (English) - Page 34
Adjusting the brightness of the monitor, processing function [PIXEL MAPPING]
 |
UPC - 050332172692
View all Olympus FE-4030 manuals
Add to My Manuals
Save this manual to your list of manuals |
Page 34 highlights
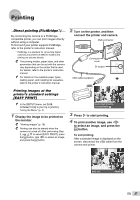
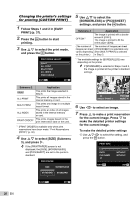
Selecting the camera sound and its volume [SOUND SETTINGS] s (Settings 2) X SOUND SETTINGS Submenu 2 SILENT MODE*1, 2 BEEP SHUTTER SOUND 8 q VOLUME Submenu 3 OFF/ON SOUND TYPE VOLUME SOUND TYPE VOLUME OFF (No Sound) or 2 levels of volume OFF (No Sound) or 5 levels of volume Submenu 4 - 1/2/3 OFF (No Sound) or 2 levels of volume 1/2/3 OFF (No Sound) or 2 levels of volume - - Application Select [ON] to disable camera sounds (operating sound, shutter sound, and warning sound) and mute sound during playback. Selects the operating sound and volume of the camera buttons (except the shutter button). Selects the type and volume of the shutter sound. Adjusts the warning sound volume. Adjusts the image playback volume. *1 Even when [SILENT MODE] is [ON], FG can be used to adjust volume during playback. *2 Even when [SILENT MODE] is [ON], sound is played when images are displayed on a television. Adjusting the CCD and the image processing function [PIXEL MAPPING] s (Settings 2) X PIXEL MAPPING This function has already been adjusted at factory shipping, and no adjustment is needed right after purchase. Approximately once a year is recommended. For best results, wait at least one minute after taking or viewing pictures before performing pixel mapping. If the camera is turned off during pixel mapping, be sure to perform it again. To adjust the CCD and the image processing function Press the H button when [START] (Submenu 2) is displayed. ● The camera checks and adjusts the CCD and the image processing function at the same time. Adjusting the brightness of the monitor [s] s (Settings 2) X s Submenu 2 BRIGHT/ NORMAL Application Selects the monitor brightness depending on the surrounding brightness. Setting the date and time [X] s (Settings 2) X X "Setting the date, time and time zone" (p. 12) To select the date display order 1 Press I after setting Minute, and use FG to select the date display order. X Y M D TIME Date order 2010. 02 . 26 12 : 30 Y/M/D CANCEL MENU SET OK 34 EN
-
 1
1 -
2
-
3
-
4
-
5
-
6
-
7
-
8
-
9
-
10
-
11
-
12
-
13
-
14
-
15
-
16
-
17
-
18
-
19
-
20
-
21
-
22
-
23
-
24
-
25
-
26
-
27
-
28
-
 29
29 -
 30
30 -
 31
31 -
 32
32 -
 33
33 -
 34
34 -
 35
35 -
 36
36 -
 37
37 -
 38
38 -
 39
39 -
40
-
41
-
42
-
43
-
44
-
45
-
46
-
47
-
48
-
49
-
50
-
51
-
52
-
53
-
54
-
55
-
56
-
57
-
58
-
59
-
60
-
61
 |
 |
