Olympus FE-46 FE-46 Instruction Manual (English) - Page 28
Menus for Playback, Editing, and Printing Functions, Playing back pictures automatically, SLIDESHOW]
 |
UPC - 050332171145
View all Olympus FE-46 manuals
Add to My Manuals
Save this manual to your list of manuals |
Page 28 highlights
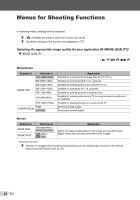
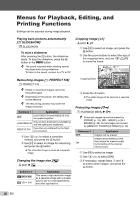
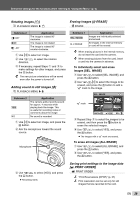
Menus for Playback, Editing, and Printing Functions Settings can be adjusted during image playback. Playing back pictures automatically [G SLIDESHOW] G SLIDESHOW To start a slideshow After pressing the B button, the slideshow starts. To stop the slideshow, press the B button or the m button. The sound recorded when shooting cannot be played back during slideshow. To listen to the sound, connect to a TV or PC. Cropping image [P] I EDIT X P 1 Use mn to select an image, and press the B button. 2 Use the zoom buttons to select the size of the cropping frame, and use klmn to move the frame. Retouching images [H PERFECT FIX] H PERFECT FIX Edited or retouched images cannot be retouched again. Depending on the picture, the editing may not be effective. The retouching process may lower the image resolution. Submenu 1 Application ALL [LIGHTING FIX] and [REDEYE FIX] are applied together. LIGHTING FIX Only sections darkened by backlighting and dim lighting are brightened. REDEYE FIX Eyes that are reddened by the flash are corrected. 1 Use kl to select a correction method, and press the B button. 2 Use mn to select an image for retouching, and press the B button. ● The retouched image is saved as a separate image. Changing the image size [Q] I EDIT X Q Submenu 2 C 640 × 480 E 320 × 240 Application This saves a high-resolution image as a separate image with a smaller size for use in e-mail attachments and other applications. Cropping frame WT SET OK 3 Press the B button. ● The edited image will be saved as a separate image. Protecting images [0] J PLAYBACK MENU X 0 Protected images cannot be erased by [ERASE] (p. 16), [SEL. IMAGE], or [ALL ERASE] (p. 29), but all images are erased by [MEMORY FORMAT]/[FORMAT] (p. 30). Submenu 2 OFF ON Application Images can be erased. Images are protected so that they cannot be erased except by formatting of the internal memory/card. 1 Use mn to select an image. 2 Use kl to select [ON]. 3 If necessary, repeat Steps 1 and 2 to protect other images, and press the B button. 28 EN
-
 1
1 -
2
-
3
-
4
-
5
-
6
-
7
-
8
-
9
-
10
-
11
-
12
-
13
-
14
-
15
-
16
-
17
-
18
-
19
-
20
-
21
-
22
-
 23
23 -
 24
24 -
 25
25 -
 26
26 -
 27
27 -
 28
28 -
 29
29 -
 30
30 -
 31
31 -
 32
32 -
 33
33 -
34
-
35
-
36
-
37
-
38
-
39
-
40
-
41
-
42
-
43
-
44
-
45
-
46
-
47
-
48
-
49
-
50
-
51
-
52
-
53
-
54
-
55
-
56
-
57
-
58
-
59
-
60
-
61
 |
 |