Olympus PS100 P-S100 User's Manual (English, French, Spanish) - Page 25
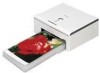
Connecting a digital camera to the printer - guide
 |
View all Olympus PS100 manuals
Add to My Manuals
Save this manual to your list of manuals |
Page 25 highlights
Printing Printing pictures from a digital camera Connecting a digital camera to the printer The procedure below assumes that you are connecting a PictBridge-compatible digital camera. Use the USB cable supplied with the digital camera to connect. Refer to the "QUICK START GUIDE" for Dock&Done connection. 1 Turn on the printer. For details, refer to "Plugging in to an outlet and turning the printer on/off" (gpage 18). 2 Plug one end of the USB cable into the USB connector on the digital camera, and then plug the other end into the PictBridge connector on the rear of the printer. 3 Turn on the digital camera and prepare it for printing. The ACCESS indicator on the printer turns on for a few moments and then turns off. For details on how to use the digital camera, refer to the instruction manual supplied with the digital camera. EN-25
-
 1
1 -
2
-
3
-
4
-
5
-
6
-
7
-
8
-
9
-
10
-
11
-
12
-
13
-
14
-
15
-
16
-
17
-
18
-
19
-
 20
20 -
 21
21 -
 22
22 -
 23
23 -
 24
24 -
 25
25 -
 26
26 -
 27
27 -
 28
28 -
 29
29 -
 30
30 -
31
-
32
-
33
-
34
-
35
-
36
-
37
-
38
-
39
-
40
-
41
-
42
-
43
-
44
-
45
-
46
-
47
-
48
-
49
-
50
-
51
-
52
-
53
-
54
-
55
-
56
-
57
-
58
-
59
-
60
-
61
-
62
-
63
-
64
-
65
-
66
-
67
-
68
-
69
-
70
-
71
-
72
-
73
-
74
-
75
-
76
-
77
-
78
-
79
-
80
-
81
-
82
-
83
-
84
-
85
-
86
-
87
-
88
-
89
-
90
-
91
-
92
-
93
-
94
-
95
-
96
-
97
-
98
-
99
-
100
-
101
-
102
-
103
-
104
-
105
-
106
-
107
-
108
-
109
-
110
-
111
-
112
-
113
-
114
-
115
-
116
-
117
-
118
-
119
-
120
-
121
-
122
-
123
-
124
-
125
-
126
-
127
-
128
-
129
-
130
-
131
-
132
 |
 |
