Olympus S701 STYLUS-7010 Instruction Manual (English) - Page 30
Creating panoramic images, PANORAMA], Taking pictures with, COMBINE IN CAMERA 1] - manual
 |
UPC - 050332293342
View all Olympus S701 manuals
Add to My Manuals
Save this manual to your list of manuals |
Page 30 highlights
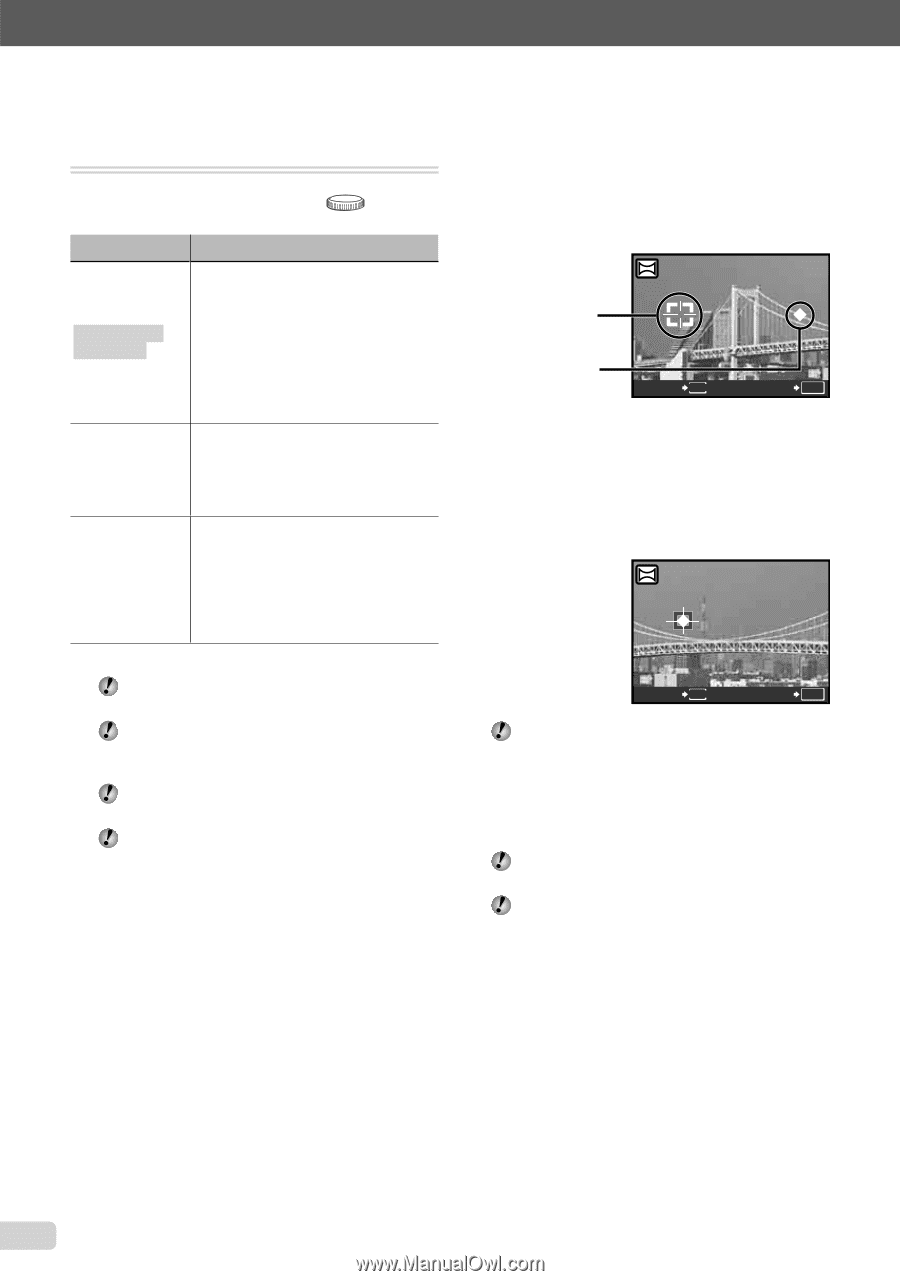
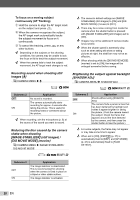
Creating panoramic images [G PANORAMA] G PANORAMA : K s Submenu 2 Application COMBINE IN CAMERA 1*1 Three frames are taken and combined by the camera. The user only composes the shots so that the target marks and pointers overlap, and the camera automatically releases the shutter. The shooting functions are already preset to the optimum settings for panoramic shooting. COMBINE IN CAMERA 2 Three frames are taken and combined by the camera. The user composes the shots using the guide frame and manually releases the shutter. The frames that were taken are combined into a panorama image using the OLYMPUS Master 2 COMBINE IN PC software from the provided CD-ROM. Pictures are taken in the last [ISO] or [J s] settings. (Excluding certain scenes.) *1 Not available in s mode (p. 17). The [A IMAGE QUALITY] (p. 25) setting cannot be changed. The focus, exposure (p. 14), zoom position (p. 19), and [WB] (p. 26) are locked at the first frame. The flash (p. 19) is fixed to $ (FLASH OFF) mode. "Playing back panorama images" (p. 24) Taking pictures with [COMBINE IN CAMERA 1] 1 Press the shutter button to take the first frame. 2 Move the camera slightly in the direction of the second frame. Target mark Pointer CANCEL MENU SAVE OK Screen when combining images from left to right 3 Move the camera slowly while keeping it straight, and stop the camera where the pointer and target mark overlap. ● The camera releases the shutter automatically. CANCEL MENU SAVE OK To combine only two pictures, press the E button before taking a third frame. 4 Repeat Step 3 to take a third frame. ● After the third frame is taken, the camera automatically processes the frames and the combined panorama image is displayed. To exit the panorama function without saving an image, press the m button. If the shutter does not automatically release, try [COMBINE IN CAMERA 2] or [COMBINE IN PC]. 30 EN
-
 1
1 -
2
-
3
-
4
-
5
-
6
-
7
-
8
-
9
-
10
-
11
-
12
-
13
-
14
-
15
-
16
-
17
-
18
-
19
-
20
-
21
-
22
-
23
-
24
-
 25
25 -
 26
26 -
 27
27 -
 28
28 -
 29
29 -
 30
30 -
 31
31 -
 32
32 -
 33
33 -
 34
34 -
 35
35 -
36
-
37
-
38
-
39
-
40
-
41
-
42
-
43
-
44
-
45
-
46
-
47
-
48
-
49
-
50
-
51
-
52
-
53
-
54
-
55
-
56
-
57
-
58
-
59
-
60
-
61
-
62
-
63
-
64
-
65
-
66
-
67
-
68
-
69
-
70
-
71
-
72
 |
 |