Olympus Stylus Verve Stylus Verve Advanced Manual (English) - Page 100
Recording power-on screen
 |
UPC - 050332149700
View all Olympus Stylus Verve manuals
Add to My Manuals
Save this manual to your list of manuals |
Page 100 highlights
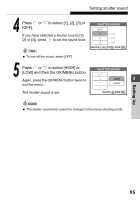
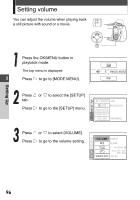
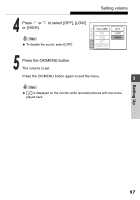
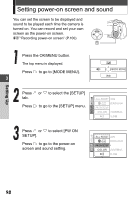
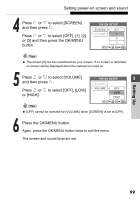
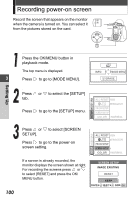
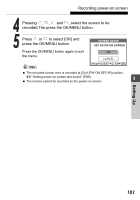
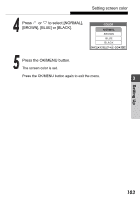
Recording power-on screen Record the screen that appears on the monitor when the camera is turned on. You can select it from the pictures stored on the card. Setting Up Press the OK/MENU button in playback mode. The top menu is displayed. 3 Press to go to [MODE MENU]. m INFO MODE MENU S ERASE Press or to select the [SETUP] tab. Press to go to the [SETUP] menu. SETUP CARD EDIT PLAY ALL RESET ON W ENGLISH PW ON SETUP SCREEN SETUP COLOR NORMAL 100 Press or to select [SCREEN SETUP]. Press to go to the power-on screen setting. SETUP CARD EDIT PLAY ALL RESET ON W ENGLISH PW ON SETUP SCREEN SETUP COLOR NORMAL If a screen is already recorded, the monitor displays the screen shown at right. For recording the screens press or to select [RESET] and press the OK/ MENU button. SCREEN SETUP IMAGE EXISTING RESET KEEP CANCEL SELECT GO
-
 1
1 -
2
-
3
-
4
-
5
-
6
-
7
-
8
-
9
-
10
-
11
-
12
-
13
-
14
-
15
-
16
-
17
-
18
-
19
-
20
-
21
-
22
-
23
-
24
-
25
-
26
-
27
-
28
-
29
-
30
-
31
-
32
-
33
-
34
-
35
-
36
-
37
-
38
-
39
-
40
-
41
-
42
-
43
-
44
-
45
-
46
-
47
-
48
-
49
-
50
-
51
-
52
-
53
-
54
-
55
-
56
-
57
-
58
-
59
-
60
-
61
-
62
-
63
-
64
-
65
-
66
-
67
-
68
-
69
-
70
-
71
-
72
-
73
-
74
-
75
-
76
-
77
-
78
-
79
-
80
-
81
-
82
-
83
-
84
-
85
-
86
-
87
-
88
-
89
-
90
-
91
-
92
-
93
-
94
-
 95
95 -
 96
96 -
 97
97 -
 98
98 -
 99
99 -
 100
100 -
 101
101 -
 102
102 -
 103
103 -
 104
104 -
 105
105 -
106
-
107
-
108
-
109
-
110
-
111
-
112
-
113
-
114
-
115
-
116
-
117
-
118
-
119
-
120
-
121
-
122
-
123
-
124
-
125
-
126
-
127
-
128
-
129
-
130
-
131
-
132
-
133
-
134
-
135
-
136
-
137
-
138
-
139
-
140
-
141
-
142
-
143
-
144
-
145
-
146
-
147
-
148
-
149
-
150
-
151
-
152
-
153
-
154
-
155
-
156
-
157
-
158
-
159
-
160
-
161
-
162
-
163
-
164
-
165
-
166
-
167
-
168
-
169
-
170
-
171
-
172
-
173
-
174
-
175
-
176
-
177
-
178
-
179
-
180
-
181
-
182
-
183
-
184
-
185
-
186
-
187
-
188
-
189
-
190
-
191
-
192
 |
 |
